
Learn from Advent of Vue
Before coding
Vue 3 becomes the new default version on February 7, 2022. When Vue first started, it was just a runtime library. Over the years, it has evolved into a framework that encompasses many sub projects.
The Vue Language Tools are essential for providing language features such as autocompletion, type checking, and diagnostics when working with Vue’s SFCs. While Volar powers the language tools, the official extension for Vue is titled Vue - Official now on the VSCode marketplace.
Vue DevTools is designed to enhance the Vue developer experience. There are multiple options to add this tool to your projects by Vite plugin, Standalone App, or Chrome Extension. Note that The v7 version of devtools only supports Vue3. If your application is still using Vue2, please install the v6 version.
Code Structure
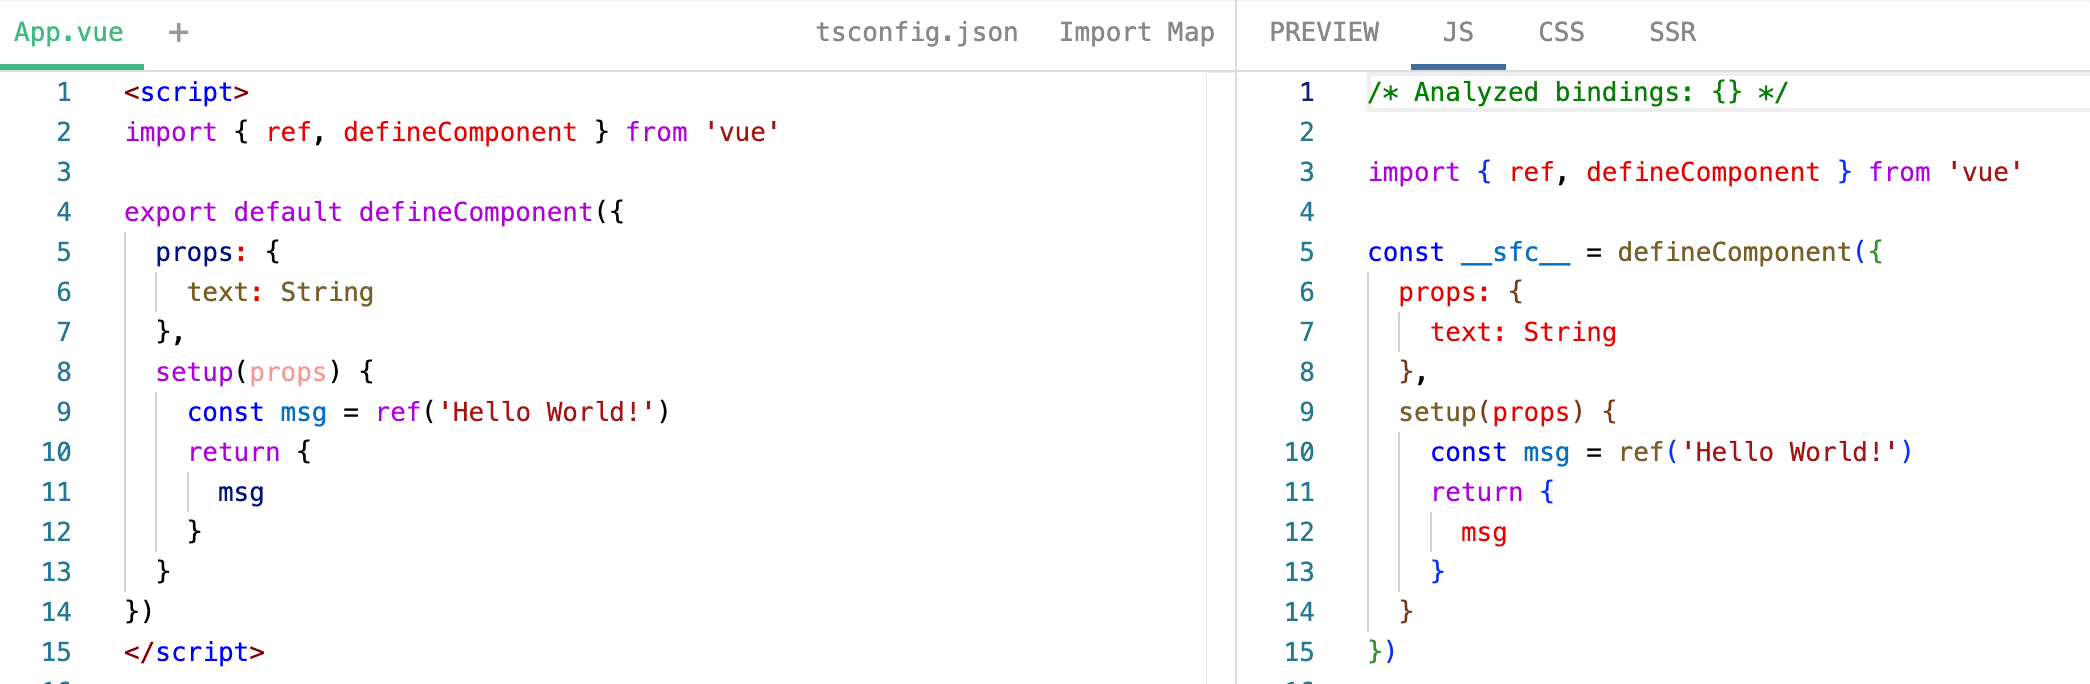
In a Vue component, <script setup> can be used alongside normal <script> using the options API. It works because the <script setup> block is compiled into the component’s setup() function. A normal <script> may be needed, for example, we need to run side effects or create objects that should only execute once in module scope (outside the export default {}).
<script>
console.log("module loaded"); // runs ONCE

export default {
  name: "MyComponent",
  created() {
    console.log("in created"); // runs EVERY time component is created
  },
};
</script>
Each
.vuefile is turned into a JavaScript ES module. So:
- Top-level code in
<script>runs once when the module is loaded.- Code inside
<script setup>or in lifecycle hooks runs every time a new component instance is created.
The data option defined in a component in Vue 2 must be a function (that returns an object), rather than an object. This is because the object returned from a function is created every time a new instance of the component is created, while an object assigned directly to the data option would be shared across all instances.
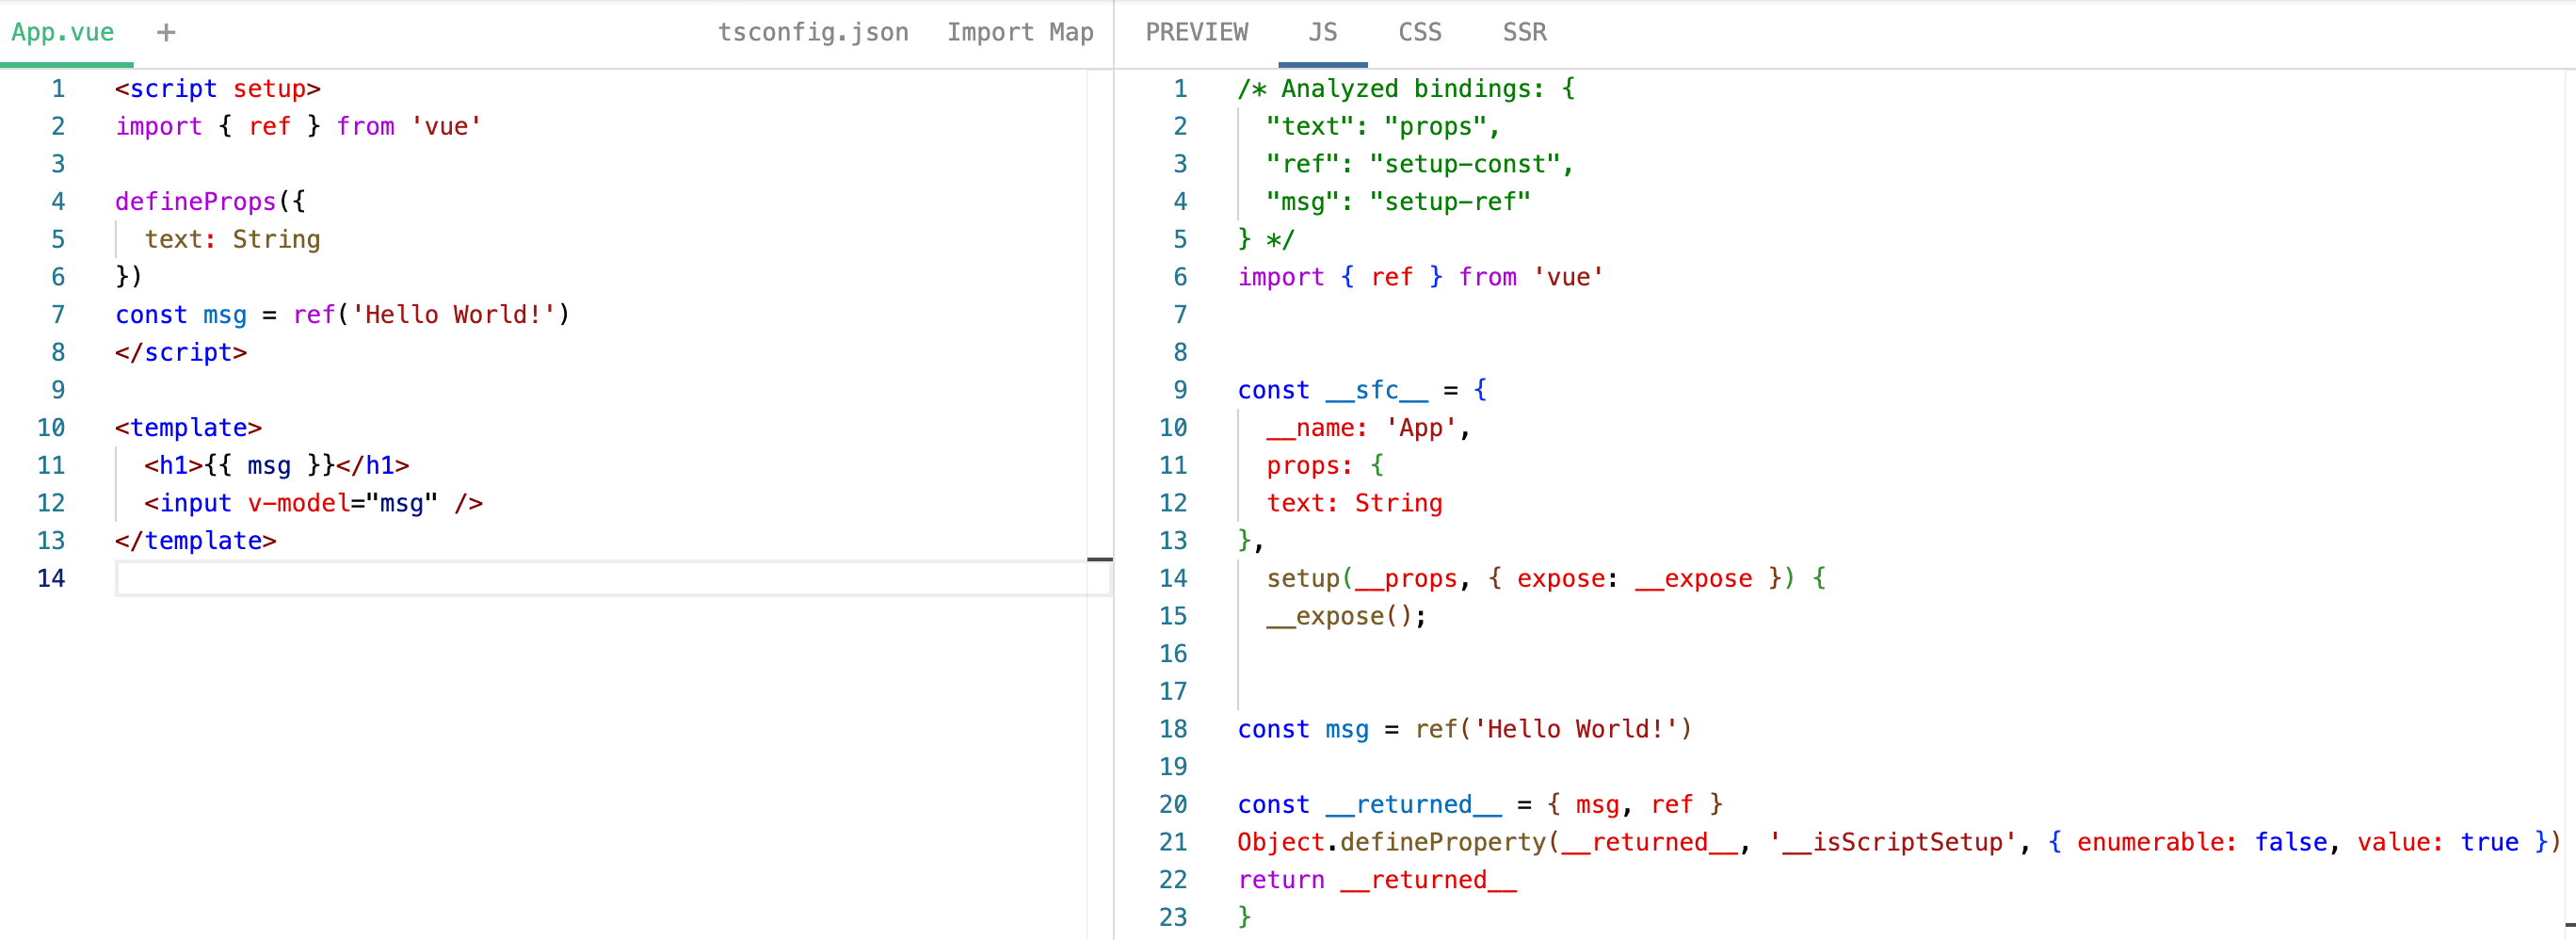
Components using <script setup> are closed by default - i.e. the public instance of the component will not expose any of the bindings declared inside <script setup>. To explicitly expose properties, use the defineExpose compiler macro.
Date Countdown
https://papaya-caramel-13dd76.netlify.app/
- Use the useNow composable from VueUse to get a reactive version of the current time and then do the math to get days, hours, minutes, and seconds.
- Use the Vue transition component to transition smoothly between each countdown number.
By the way, destructuring a value from a reactive object will break reactivity, since the reactivity comes from the object itself and not the property you’re grabbing. Using toRefs lets us destructure our props when using script setup without losing reactivity.
const { count } = defineProps<{ count: number }>(); // Don't do this!

// The first obvious solution is to not destructure the props object
const props = defineProps<{ count: number }>();
const even = computed(() => (props.count % 2 === 0 ? 'even' : 'odd'));

// Use toRefs() helper
const props = defineProps<{ count: number }>();
const { count } = toRefs(props);
const even = computed(() => (count.value % 2 === 0 ? 'even' : 'odd'));
What is the difference between
ref,toRefandtoRefs:
- The idea of using
refis to wrap a non-object variable inside a reactive object.toRefconverts a single reactive object property to a ref that maintains its connection with the parent object:const fooRef = toRef(state, 'foo').toRefsis a utility method used for destructing a reactive object and convert all its properties to ref:toRefs(state).
Adding deep reactivity to a large object can cost you a lot of performance, you can optimize the reactivity in your app by using shallowRef. Here reactivity is only triggered when the value of the ref itself is changed, but modifying any of the nested properties won’t trigger anything.
const state = shallowRef({ count: 1 });

// does NOT trigger change
state.value.count = 2;

// does trigger change
state.value = { count: 2 };
Why Vue need to use .value to access the ref property?
The .value syntax is used in Vue 3 to access the value of a ref property because refs are designed to be reactive objects rather than simple values. When you create a ref, you are actually creating an object with a single property named value. The value property holds the actual value that the ref represents, and any changes to the value property trigger reactivity. When we access the ref directly, we are accessing the object, not the value.
When you create a reactive object with reactive(), you can access its properties directly using dot notation, without needing to use .value. This is because reactive objects use JavaScript’s built-in getters and setters to intercept property access and modification, allowing Vue to track dependencies and trigger reactivity as needed.
reactive()only takes objects, NOT JS primitives.ref()is callingreactive()behind the scenes.ref()has a.valueproperty for reassigning,reactive()does not have this and therefore CANNOT be reassigned.
defineProps and compiler macros
You don’t need to import defineProps from Vue. defineProps, defineEmits, and defineExpose are compiler macros that are compiled away, and they are not actual functions in the Vue package. These are just hints for the compiler to create them nicely.
A compiler macro is special code that is processed by a compiler and converted into something else. They are effectively a clever form of string replacement.
The output structure looks like what we had before with our defineComponent approach, and the only difference is that the compiler is creating this for us.
Recursive Tree
- Recursion always requires two things: Define your base case and recursive case. To do this you need a switch of some kind (maybe a
v-if), and a value that changes with each step in the recursion. - You can either place the recusion before or after what the component is rendering. Each will give you opposite results, and the wrong one will give you an upside-down tree.
- Challenge on decorations: https://github.com/Advent-Of-Vue/2022-christmas-tree-ornaments-solution
<!-- ChristmasTree.vue -->
<template>
  <div>
    <ChristmasTree v-if="size > 1" :size="size - 1" />

    <div class="flex flex-row justify-center">
      <!-- Create the tree sections -->
      <div
        v-for="i in size"
        class="relative rounded-full bg-green w-16 h-16 -m-2 flex justify-center items-center"
      />
    </div>
  </div>
</template>
v-if vs. v-show: Generally speaking, v-if has higher toggle costs while v-show has higher initial render costs. For example, if you have a tabs component, that some tab contains a heavy component. Using v-if, it will get the component destroyed and re-created when switching tabs. Using v-show, you will need to pay the mounting cost on the initial render even you haven’t switch to that tab yet.
Use Composables
Similar idea to “Copy JSX? Create a component. Copy logic? Create a hook.”
How the Vue Composition API replaces Vue Mixins?
Normally, a Vue component is defined by a JavaScript object with various properties representing the functionality we need — things like data, methods, computed, and so on. When we want to share the same properties between components, we can extract the common properties into a separate module. Then we can add this mixin to any consuming component by assigning it to the mixin config property. At runtime, Vue will merge the properties of the component with any added mixins.
Mixins have drawbacks:
- Naming collisions. What happens if they both share a property with the same name?
- Implicit dependencies. A component can use a data property defined in the mixin but a mixin can also use a data property it assumes is defined in the component. This can cause problems. What happens if we want to refactor a component later and change the name of a variable that the mixin needs?
The key idea of the Composition API is that, rather than defining a component’s functionality as object properties, we define them as JavaScript variables that get returned from a new setup function. The clear advantage of the Composition API is that it’s easy to extract logic. It allows Vue to lean on the safeguards built into native JavaScript in order to share code, like passing variables to the composition function, and the module system.
Composition API provides the same level of logic composition capabilities as React Hooks, but with some important differences:
- Composition API calls are also not sensitive to call order and can be conditional.
- Vue’s runtime reactivity system automatically collects reactive dependencies used in computed properties and watchers. (It tracks dependencies for reactive variables and recomputes only when necessary. There is no need for manual low level performance tuning like
useMemooruseCallbackin React.) - No need to manually cache callback functions to avoid unnecessary child updates.
// useCounter.js
// https://css-tricks.com/how-the-vue-composition-api-replaces-vue-mixins/
import { ref, computed } from 'vue'
export default function () {
  const count = ref(0)
  const double = computed(() => count.value * 2)
  function increment() {
    count.value++
  }
  return {
    count,
    double,
    increment
  }
}

// useEvent composable
import { onMounted, onBeforeUnmount } from 'vue'
export function useEvent = (event, handler, options) => {
  const {
    target = window,
    listener,
  } = options
  onMounted(() => {
    target.addEventListener(event, handler, listener)
  })
  onBeforeUnmount(() => {
    target.removeEventListener(event, handler, listener)
  })
}

// useTimeout composable
export function useTimeout = (fn, delay, options) => {
  const immediate = options?.immediate
  if (immediate) {
    fn()
  }

  // The effect function receives a function that can be used to register a cleanup callback.
  // The cleanup callback will be called right before the next time the effect is re-run.
  watchEffect(onCleanup => {
    if (isRef(delay)) {
      if (typeof delay.value !== 'number' || delay.value < 0) return
    } else {
      if (typeof delay !== 'number' || delay < 0) return
    }
    const _delay = unref(delay)
    const timer = setTimeout(() => {
      fn()
    }, _delay)

    onCleanup(() => {
      clearTimeout(timer)
    })
  })
}
Each component instance calling
useXXX()will create its own copies of state so they won’t interfere with one another. But if you put those values outside of the composable function, it will persist, like a basic state or store. When you need to access those values later somewhere else, they won’t be reset everytime you call the composable. (Potential issues in SSR: State declared outside component scope persists between requests.)
More about watchEffect:
watchEffectruns a callback function immediately and automatically tracks its reactive dependencies. The callback function is executed whenever any of the reactive dependencies change.- The callback function receives a special function called
onCleanupas its first argument. You can use this function to register a cleanup callback that will be called before the watcher is re-executed. - A confusing caveat is that
watchEffectonly tracks dependencies during its synchronous execution. When using it with an async callback, only properties accessed before the firstawaittick will be tracked. Everything after theawaitwill NOT be tracked.
// `onCleanup` function is also passed to watcher callbacks as the 3rd argument
watch(searchQuery, (query, oldQuery, onCleanup) => {
  searchResults.value = [];

  const timerId = setTimeout(async () => {
    const results = await fetch(`/api/search?q=${query}`);
    searchResults.value = await results.json();
  }, 300);

  onCleanup(() => clearTimeout(timerId));
});
Vue calls your cleanup function in two situations: when the watcher is about to run again, and when the watcher stops completely (like when a component unmounts).
Watchers callback flush timing
Similar to component updates, user-created watcher callbacks are batched to avoid duplicate invocations.
By default, a watcher’s callback is called after parent component updates (if any), and before the owner component’s DOM updates. This means if you attempt to access the owner component’s own DOM inside a watcher callback, the DOM will be in a pre-update state.
const count = ref(0);
const countRef = useTemplateRef("countRef"); // Vue 3.5+
const logs = ref([]);

const watchFn = (type) => () => {
  logs.value.push(
    "Watcher type " + type + ": Count is " + CountRef.value.innerText,
  );
};

watch(count, watchFn("pre")); // default, Count is 0
watch(count, watchFn("post"), { flush: "post" }); // Count is 1
// 'sync' runs first, fires synchronously, before any Vue-managed updates
watch(count, watchFn("sync"), { flush: "sync" }); // Count is 0
Write better Vue composables
We abandon the options API for the composition API, and the idea is not that we write everything the same way as the options API but not having the data/computed/watch options.
// Common mistake: Grouping by options
// data
const originalMessage = ref("Hello World!");
const isReversed = ref(false);

// computed
const message = computed(() => {
  if (isReversed.value) {
    return originalMessage.value.split("").reverse().join("");
  }
  return originalMessage.value;
});

// watch...
// Let's Refactor it
// Message-related stuff
const originalMessage = ref("Hello World!");
const { toggleReverse, message } = useMessage(originalMessage);
// create `useMessage.js` file or inline composables
function useMessage(input) {
const originalMessage = toRef(input);
const reversedMessage = computed(() =>
originalMessage.value.split("").reverse().join("")
);
const isReversed = ref(false);
function toggleReverse() {
isReversed.value = !isReversed.value;
}
const message = computed(() => {
if (isReversed.value) {
return reversedMessage.value;
}
return originalMessage.value;
});
return {
toggleReverse,
message,
};
}It is possible to use both Options API and Composition API. Although you can access Composition API from the Options API, it’s a one-way street. The Composition API cannot access anything defined through the Options API.
export default {
  setup() {
    const darkMode = ref(false);
    // We can't access the method
    // this.changeTheme(true)
    return { darkMode };
  },
  methods: {
    saveDarkMode() {
      localStorage.setItem("dark-mode", this.darkMode);
    },
    changeTheme(val) {
      // We can update values from the Options API
      this.darkMode = val;
    },
  },
};
Writable Computed Refs
const firstName = ref("");
const lastName = ref("");

const fullName = computed({
  get: () => `${firstName.value} ${lastName.value}`,
  set: (val) => {
    const split = val.split(" "); // ['Michael', 'Thiessen']
    firstName.value = split[0]; // 'Michael'
    lastName.value = split[1]; // 'Thiessen'
  },
});

fullName.value = "Michael Thiessen";
console.log(lastName.value); // 'Thiessen'
A common mistake using computed is non reactive value as a dependency. Often developers need some reactivity when working with browser API’s, but the APIs are not reactive. To get around this, we will use VueUse library that adds reactivity to web browser APIs. (VueUse makes non‑reactive browser data reactive by storing it in ref or reactive objects and updating those values using browser event listeners or polling.)
const videoPlayer = ref<HTMLVideoElement>();
// wrong, not reactive
const playing = computed(() => !videoPlayer.value?.paused);

// instead, use composable from VueUse that provides a reactive ref
const { playing: videoPlaying} = useMediaControls(videoRef, {
  src: "/example.mp4",
});
Slots in Vue
<template>
  <div class="named-slot">
    <h2><slot name="title">default</slot></h2>
    <slot></slot>
  </div>

  <div class="scoped-slot">
    <h2><slot>default</slot></h2>
    <slot name="display" :number="likeCount" :message="message"></slot>
    <button type="button" @click="handleClick">Like</button>
  </div>
</template><template>
<SlotsNamed>
<template #title>
<span>My Title</span>
</template>
<template #default>
<p>Put me in, coach!</p>
</template>
</SlotsNamed>
<SlotsScoped>
<template #default>
<span>My Likes</span>
</template>
<template #display="{ number, message }">
<p>{{ number }}</p>
<p>{{ message }}</p>
</template>
</SlotsScoped>
</template>
<template v-slot="{ number, message }">is same as<template #default="{ number, message }">
<template v-slot:display="{ number, message }"is same as<template #display="{ number, message }">
Async Components
Vue allows us to divide an app into smaller chunks by loading components asynchronously with the help of the defineAsyncComponent() function, which accepts a loader function that returns a Promise that resolves to the imported component.
import { defineAsyncComponent } from "vue";

export const AsyncModal = defineAsyncComponent(() => import("./Modal.vue"));<template>
<button id="show-modal" @click="showModal = true">Show Modal</button>
<AsyncModal v-if="showModal" :show="showModal" @close="showModal = false" />
</template>
<script setup>
import { ref } from "vue";
import { AsyncModal } from "./components/AsyncModal.js";
const showModal = ref(false);
</script>The AsyncModal is a wrapper component that only calls the loader function when it is actually rendered on the page.
When our application webpage initially loads, we’ll recognize that the bundle for the Modal component is no longer loaded automatically upon page load. When we click the button to trigger the modal to be shown, we’ll notice the bundle is then asynchronously loaded as the modal component is being rendered.
For Vue 2, the following example shows how to lazy load a component. By passing () => import("./tooltip") instead of the static import Tooltip from "./tooltip". Vue will lazy load that component as soon as is requested to be rendered, which normally happens right away when the App component gets mounted. However, in practice, we’d like to defer the Tooltip component loading until it is required, which for example when hovering a button or text.
<template>
  <div>
    <button @click="show = true">Load Tooltip</button>
    <div v-if="show">
      <tooltip></tooltip>
    </div>
  </div>
</template>

<script>
export default {
  data: () => ({ show: false }),
  components: {
    Tooltip: () => import("./Tooltip"),
    // Tooltip: () => ({
    //   component: import("./Tooltip"),
    //   loading: AwesomeSpinner,
    //   error: SadFaceComponent,
    //   timeout: 5000,
    // })
  },
};
</script>
Custom Directives
<div class="w-full h-full flex flex-col justify-center items-center text-center gap-12">
  <p v-christmas>Red + Green (default)</p>
  <p v-christmas:red>Red only</p>
  <p v-christmas:green>Green only</p>
  <p v-christmas="5">Slower Animation</p>
</div>
// main.js
const app = createApp(App);
app.directive("christmas", (el, binding) => {
const duration = binding.value ?? 2; // the length of the animation in seconds
const color = binding.arg ?? "red-green"; // the class to add for the different colors
// this will be called for both `mounted` and `updated`
el.classList.add("christmas-text", color);
el.style.animationDuration = duration + "s";
});
app.mount("#app");elis the DOM element the directive is bound to. You can manipulate it directly to set styles, classes, listeners, etc.bindingis an object containing data about the binding. It includesvalue(v-christmas=“myValue”),arg(v-christmas:color),modifiers(v-christmas.foo.bar), etc.
Global Properties
It’s possible to add global properties to your Vue app in both Vue 2 and Vue 3. Prefixing global properties with a $ helps prevent naming conflicts with other variables, and it’s a standard convention that makes it easy to spot when a value is global.
// Vue 3
const app = createApp({});
app.config.globalProperties.$myGlobalVariable = "foo";

// Vue 2
Vue.prototype.$myGlobalVariable = "foo";
Properties added to globalProperties will be available via the component instance for all components within the application. So if you’re using the Options API you’ll be able to access them using this.$myGlobalVariable, just like you could with Vue.prototype. They’ll also be available in the template without the this, e.g. {{ $myGlobalVariable }}.
If you’re using the Composition API then you’ll still be able to use these properties within the template, but you won’t have access to the component instance within setup, so these properties won’t be accessible there. (Composition API is designed to be context-free and has no access to this.) Application-level provide/inject can be used as an alternative to Vue.prototype.
const app = createApp(RootComponent)
app.provide('myGlobalVariable', globalVariable)

// In the descendant component
<script setup>
import { inject } from 'vue'
const myGlobalVariable = inject('myGlobalVariable')
</script>
How to Use Provide/Inject
Vue’s Provide/Inject API is a powerful feature that allows components to share data without prop drilling. It is not meant for global state management but rather for local component hierarchies.
// parent component to make data available to its descendants
const message = ref("Hello from parent");
provide("sharedMessage", message);

// child component consume the provided data
const sharedMessage = inject("sharedMessage");- Provide/Inject is best suited for sharing dependencies like form contexts, themes, or service instances, rather than global state management. If multiple components rely on the same data structure, consider Vuex or Pinia.
- Since
providepasses values by reference, you may need to useref()orreactive()to ensure reactivity.
Renderless Components
Renderless components can be an alternative to composables when finding ways to design reusable logic in your Vue apps. As you might guess, they don’t render anything. Instead, they handle all the logic inside a script section and then expose properties through a scoped slot.
Contentless components provide a container, and you have to supply the content. Think of a button, a menu, or a card component. Slots allow you to pass in whatever markup and components you want, and they also are relatively open-ended, giving you lots of flexibility.
<!-- NorthPoleDistance.vue -->
<script setup lang="ts">
import { getDistanceKm, getDistanceMiles } from "@/utils/distance";
import { useGeolocation } from "@vueuse/core";
import { computed, ref } from "vue";

const { coords } = useGeolocation();

const unit = ref<"km" | "mile">("mile");

const distance = computed(() => {
  return unit.value === "km"
    ? getDistanceKm(coords.value.latitude, coords.value.longitude)
    : getDistanceMiles(coords.value.latitude, coords.value.longitude);
});

const toggleUnit = () => {
  if (unit.value === "km") {
    unit.value = "mile";
  } else {
    unit.value = "km";
  }
};
</script>

<template>
  <!-- this should only render a slot -->
  <!-- or :unit="unit" :distance="distance" :toggleUnit="toggleUnit" -->
  <slot v-bind="{ unit, distance, toggleUnit }" />
</template>

<!-- App.vue -->
<template>
  <div class="container mx-auto px-4">
    <h2>Example</h2>
    <NorthPoleDistance v-slot="{ distance, toggleUnit, unit }">
      <p>
        You are currently: {{ distance }} {{ unit }}s away from the North Pole.
      </p>
      <button @click="toggleUnit" class="bg-green text-white px-4 py-2 rounded">
        Toggle Unit
      </button>
    </NorthPoleDistance>
  </div>
</template>
Composables and renderless components are two patterns in Vue that offer different approaches for encapsulating and reusing logic. Composables typically consist of functions that return reactive data and methods, which can be imported and used in different components. On the other hand, renderless components focus on separating the logic of a component from its presentation by having the parent component take care of rendering the appropriate UI.
// Option 1: composables
export function useCheckboxToggle() {
  const checkbox = ref(false);

  const toggleCheckbox = () => {
    checkbox.value = !checkbox.value;
  };

  return {
    checkbox,
    toggleCheckbox,
  };
}
<!-- Option 2: renderless components -->
<template>
<slot :checkbox="checkbox" :toggleCheckbox="toggleCheckbox"></slot>
</template>
<script setup>
import { ref } from "vue";
const checkbox = ref(false);
const toggleCheckbox = () => {
checkbox.value = !checkbox.value;
};
</script>Render function
When using the render function instead of templates, you’ll be using the h function a lot (hyperscript - “JavaScript that produces HTML”). It creates a virtual node, an object that Vue uses internally to track updates and what it should be rendering. These render functions are essentially what is happening “under the hood” when Vue compiles your single file components to be run in the browser.
If you write render functions, you can use runtime-only builds and save bundle size. No template compiler needed if you don’t use templates.
- Standalone build: includes both the compiler and the runtime.
- Runtime only build: since it doesn’t include the compiler, you need to either pre-compiled templates in a compile step, or manually written render functions. The npm package will export this build by default, since when consuming Vue from npm, you will likely be using a compilation step, during which vue-loader will perform the template pre-compilation.
<script>
import { h } from "vue";

export default {
  render() {
    // The first argument is either an HTML element name or a component
    // The second argument is a list of props, attributes, and event handlers
    // The third argument is either a string for a text node or an array of children VNodes
    return h("div", {}, [
      h("h1", {}, "Render Functions are awesome"),
      h("p", { class: "text-blue-400" }, "Some text"),
    ]);
  },
};
</script>