
Start a JavaScript stack project
Start a modern web project
Start with templates:
# `npm create` is an alias for `npm init`
npm create vite@latest

npm create vite@latest my-vue-app -- --template vue
npx create-next-app@latest my-app
npx shadcn-ui@latest initA typical full stack web application with Next.js, React, shadcn/ui, Prisma, and MySQL:
- @clerk/nextjs: add authentication and user management to your Next.js application.
- prisma and @prisma/client: an open-source ORM for Node.js and TypeScript. You can integrate Prisma with PlanetScale, a MySQL-compatible serverless database.
- Neon is a serverless Postgres platform, Neon is to PostgreSQL as PlanetScale is to MySQL. Neon provides a generous free tier, making it a good fit for small applications and hobby projects. (PlanetScale has made the decision to stop offering the Hobby tier.)
- Upstash is a serverless data platform with Redis, Kafka and Vector Database APIs.
- zustand: one of many state management libraries for React. It’s kinda like Redux, but much simpler.
- lucide-react: implementation of the lucide icon library for react applications.
- next-cloudinary: a community-built solution for using Cloudinary in a Next.js project. It includes tools like the
CldImagecomponent, social cards, and an upload widget. - recharts: chart library to help you to write charts in React.
- stripe: access to the Stripe API from applications, and use webhook to get real-time updates.
- @mux/mux-node is a Mux API wrapper for Node projects to post a video. Note that this package uses Mux access tokens and secret keys and is intended to be used in server-side code only. Also add @mux/mux-player-react to integrate Mux player into your web application.
- next-video is a react component for adding video to your next.js application. It extends both the
<video>element and your Next app with features for automatic video optimization. By default next-video uses Mux. - react-confetti: create a confetti effect to celebrate the accomplishment of particular steps in an application.
- Vaul is an unstyled drawer component for React that can be used as a Dialog replacement on tablet and mobile devices.
- next-auth is a complete open-source authentication solution for Next.js applications. auth-nextjs-tutorial is an example project covering both OAuth providers and traditional credential-based authentication.
Why Next.js written by @leeerob: I never need to write separate backends for projects I want to create. I can build my entire project with Next.js. I never have to worry about bundler, compiler, or frontend infrastructure. I’m able to use the latest React features, which I personally find to have a great developer experience. Next.js provides a bunch of components that help me keep my site fast.
Remix - full stack web framework
- Remix Tutorial: https://remix.run/start/tutorial
- Remix Templates: https://remix.run/docs/en/main/guides/templates
- Remix for Next.js Developers: https://remixfornextdevs.com
export const action = async ({ params, request }: ActionArgs) => {
  invariant(params.contactId, "Missing contactId param");
  const formData = await request.formData();
  return updateContact(params.contactId, {
    favorite: formData.get("favorite") === "true",
  });
};

export const loader = async ({ params }: LoaderArgs) => {
  invariant(params.contactId, "Missing contactId param");
  const contact = await getContact(params.contactId);
  if (!contact) {
    throw new Response("Not Found", { status: 404 });
  }
  return json({ contact });
};
An
invariantfunction from tiny-invariant takes a value, and if the value is falsy then the invariant function will throw. If the value is truthy, then the function will not throw.
Modular architecture
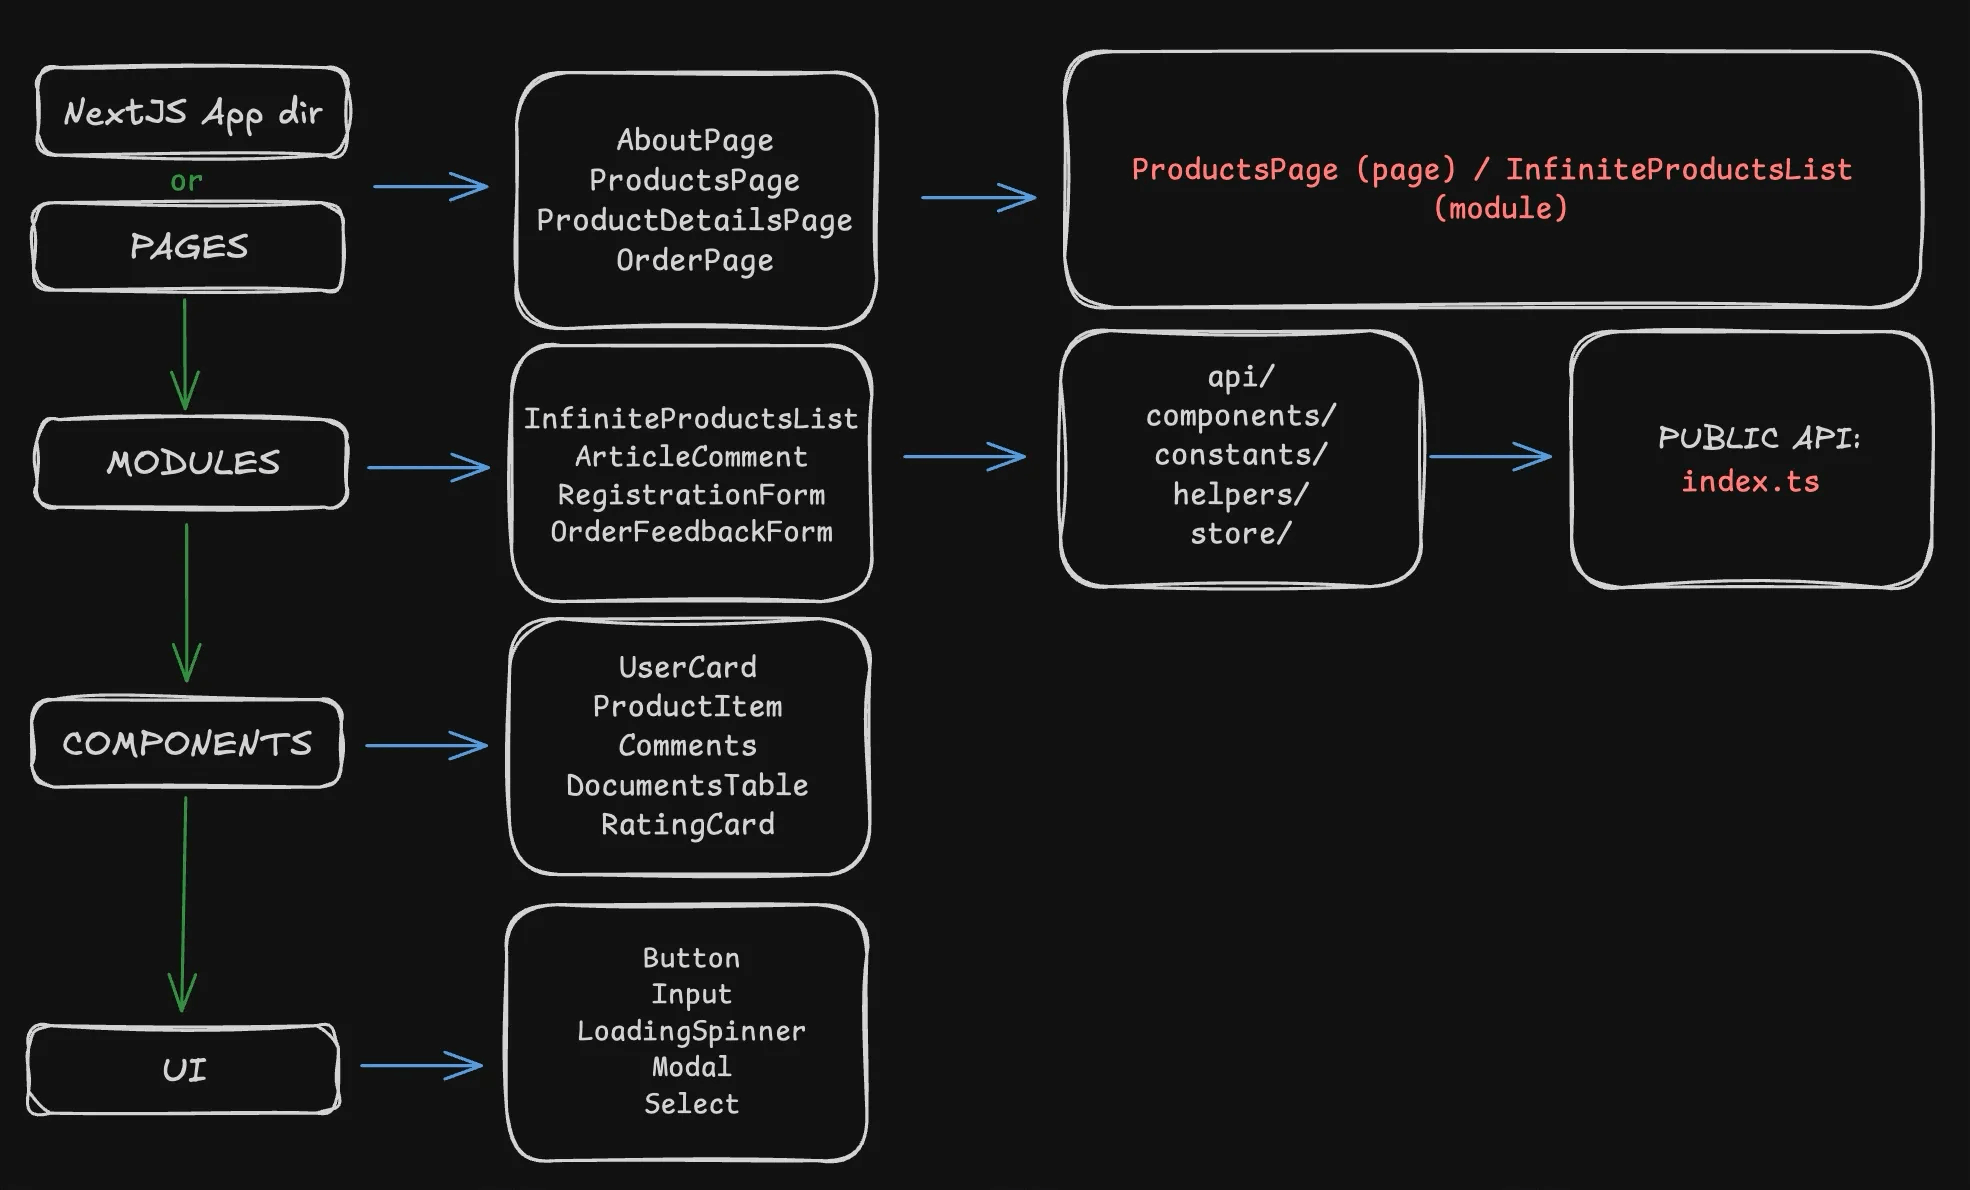
- Components can’t use modules, but can use everything from the UI layer, while modules use components but can’t use pages. And pages only use modules.
- A module shouldn’t use another module, and a component should’t contain complex logic. If logic is still needed, it should be as simple and easily maintainable as possible, otherwise — it’s a module.
Writing CSS in 2024
CSS-in-JS libraries (e.g. styled-components, Emotion for React) allows you to style your components by writing CSS directly in your JavaScript code. The good part includes making styles locally-scoped by default, colocating styles with components, enabling you to reference JavaScript variables in your style rules. But CSS-in-JS adds runtime overhead, the library must “serialize” your styles into plain CSS string that can be inserted into the document. Every time the component renders, the object styles are serialized again. Btw, using CSS-in-JS with newer React features like Server Components and Streaming requires library authors to support the latest version of React.
// const btnStyles = css`
//   width: 100px;
//   height: 100px;
//   color: ${red};
// `;
//
const styleElement = document.createElement("style");
document.head.appendChild(styleElement);
const sheet = styleElement.sheet;

const interleave = (strings, interpolations) => {
  return strings.reduce(
    (output, str, i) => output + str + (interpolations[i] ?? ""),
    "",
  );
};

export const css = (strings, ...interpolations) => {
  const styleString = interleave(strings, interpolations).trim();
  // We use 36 as the radix here so that the output string uses the 26 alphabet characters as well.
  // e.g. css-0, css-a
  const className = `css-${sheet.cssRules.length.toString(36)}`;

  // sheet.insertRule(ruleText, index);
  sheet.insertRule(`.${className} { ${styleString} }`, sheet.cssRules.length);
  return className;
};
CSS Modules are a small but impactful enhancement on top of vanilla CSS. A CSS Module is a CSS file where all class names are scoped locally by default. Each class name or identifier is renamed to include a unique hash, and a mapping is exported to JavaScript to allow referencing them. CSS Modules are available in almost every modern bundler and framework. For example, in Vite or Next.js, any CSS file ending with .module.css is considered a CSS modules file. import styles from './abc.module.css' and use styles.foo as class name.
Tailwind uses a compiler to generate the classes only used. So while the utility CSS framework contains many possible class names, only the classes used in your project will be included in the single, compiled CSS file. Tailwind classes are just utilities for normal CSS that adhere to a design system.
Tailwind uses a mobile-first breakpoint system. What this means is that unprefixed utilities (like uppercase) take effect on all screen sizes, while prefixed utilities (like md:uppercase) only take effect at the specified breakpoint and above. To style something for mobile, you need to use the unprefixed version of a utility, not the sm: prefixed version.
The way Tailwind scans your source code for classes is intentionally very simple — we don’t actually parse or execute any of your code in the language it’s written in, we just use regular expressions to extract every string that could possibly be a class name. So don’t construct class names dynamically.
// What `twMerge` and `clsx` solve
// `tailwind-merge` intelligently merges conflicting Tailwind classes.
// twMerge('px-2 py-1 bg-red', 'p-3 bg-[#B91C1C]');
//
// But some developers prefer to use an object-based syntax for conditional classes
// `clsx` is generally used to construct className strings conditionally.
// clsx({ foo:true, bar:false, baz:isTrue() });
//
// Combine twMerge and clsx to a single `cn` (short for "class names") function
import { clsx } from "clsx";
import { twMerge } from "tailwind-merge";

export function cn(...inputs) {
  return twMerge(clsx(inputs));
}

// more `clsx` examples
clsx("foo", true && "bar", "baz");
// => 'foo bar baz'

clsx({ foo: true, bar: false, baz: isTrue() });
// => 'foo baz'

clsx({ foo: true }, { bar: false }, null, { "--foobar": "hello" });
// => 'foo --foobar'

clsx(["foo", 0, false, "bar"]);
// => 'foo bar'

clsx(["foo"], ["", 0, false, "bar"], [["baz", [["hello"], "there"]]]);
// => 'foo bar baz hello there'
Lightning CSS is an extremely fast CSS parser, transformer, and minifier written in Rust. It lets you use modern CSS features and future syntax today. Features such as CSS nesting, custom media queries, high gamut color spaces, logical properties, and new selector features are automatically converted to more compatible syntax based on your browser targets. Lightning CSS is used by Vite, and soon by Tailwind and Next.js. Tools like postcss and autoprefixer are being replaced by faster, all-in-one Rust toolchains.
Lightning CSS can be used as a library from JavaScript or Rust, or from a standalone CLI. It can also be wrapped as a plugin in other build tools, and it is built into Parcel out of the box. For example, as a standalone CLI, it can be used to compile, minify, and bundle CSS files: lightningcss --minify --bundle --targets 'defaults' input.css -o output.css.
browserslist and postcss for compatibility
The browserslist configuration (either in package.json or .browserslistrc) uses caniuse data for queries to control the outputted JS/CSS so that the emitted code will be compatible with the browsers specified. It will be installed with webpack and used by many popular tools like autoprefixer, babel-preset-env. You can find these tools require browserslist in the package-lock.json file.
- There is a
defaultsquery (> 0.5%, last 2 versions, Firefox ESR, not dead), which gives a reasonable configuration for most users. - If you want to change the default set of browsers, we recommend combining
last 2 versions,not deadwith a usage number like> 0.2%. last 1 version or > 1%is equal tolast 1 version, > 1%. Each line in.browserslistrcfile is combined withorcombiner.- Display target browsers from a browserslist config: https://browsersl.ist/#q=defaults
- Run
npx browserslistin project directory to see what browsers was selected by your queries.
PostCSS is a tool for transforming CSS with JavaScript plugins. It provides features via its extensive plugin ecosystem to help improve the CSS writing experience. PostCSS plugins can do pretty much whatever they want with the parsed CSS (using AST).
- Autoprefixer is one of the many popular PostCSS plugins. It doesn’t add polyfills, only adds prefixes.
- postcss-import to transform
@importrules by inlining content. (postcss-importis different than the import rule in native CSS. You should avoid the import rule in native CSS, since it can prevent stylesheets from being downloaded concurrently which affects the loading speed and performance.) - postcss-preset-env is a plugin that allows you to use modern CSS features while automatically adding the necessary fallbacks for older browsers, based on the specified compatibility targets. It includes
Autoprefixeras part of its feature set. - cssnano is a compression tool written on top of the PostCSS ecosystem to compact CSS appropriately.
Avoid
@importin CSS: The@importrule in CSS creates additional HTTP requests and is render-blocking. Each imported file is fetched sequentially, which delays the overall CSS parsing. Instead of@import, use<link rel="stylesheet">tags in HTML (which can load in parallel) or better yet, combine CSS files at build time when possible.
Transpilers and Polyfills
When Babel compiles your code, what it’s doing is taking your syntax and running it through various syntax transforms in order to get browser compatible syntax. What it’s not doing is adding any new JavaScript primitives or any properties you may need to the browser’s global namespace. When you compile your code, you’re transforming it. When you add a polyfill, you’re adding new functionality to the browser. For example, Babel can transform arrow functions into regular functions, so they can be compiled. However, there’s nothing Babel can do to transform Promise into native syntax that browsers understand, so they need to be polyfilled.
It’s important to understand the difference between language syntax and runtime API:
- Language syntax refers to how the code is written and structured, features like
async/await, arrow functions, or destructuring. If the JavaScript engine (or Babel) doesn’t understand the syntax, it will throw a compile time error. (SyntaxError: Unexpected token ‘async’) - Runtime APIs are methods and features provided by the JavaScript engine or the environment, such as
Promise,Object.assign, orArray.prototype.includes. These are not transformed by Babel. If the runtime doesn’t support them, you’ll get a runtime error. (TypeError: Object.assign is not a function)
With syntax transforms, use @babel/preset-env. For polyfills, the most popular one is core-js.
core-js provides support for the latest ECMAScript standard and proposals, from ancient ES5 features to bleeding edge features. It is one of the main reasons why developers can use modern ECMAScript features in their development process each day for many years, but most developers just don’t know that they have this possibility because of core-js since they use core-js indirectly as it’s provided by their transpilers or frameworks.
core-jsis used by most of the popular websites. We can check it usingwindow['__core-js_shared__'].versions, see details at https://github.com/zloirock/core-js/blob/master/docs/2023-02-14-so-whats-next.md
Next.js app router and pages router
Pages in the app directory are Server Components by default. This is different from the pages directory where pages are Client Components. The app directory uses nested folders to define routes and a special page.js file to make a route segment publicly accessible.
In App Router, you should use the three new hooks imported from next/navigation: useRouter(), usePathname(), and useSearchParams(). They are all client-side hooks; For server-side equivalents, you can use the headers(), cookies(), or access params via props in Server Components.
The App Router fully embraces web standard Request/Response APIs. Instead of pages/api/*, you can now place route.ts files anywhere inside the app/ directory.
In the pages directory,getServerSideProps is used to fetch data on the server and forward props to the default exported React component in the file. In the App Router, we can colocate our data fetching inside our React components using Server Components.
In the pages directory, getStaticProps function is used to pre-render a page at build time. In the app directory, data fetching with fetch() set { cache: 'force-cache' }, which will cache the request data until manually invalidated. This is similar to getStaticProps in the pages directory.
In the pages directory, getStaticPaths function is used to define the dynamic paths that should be pre-rendered at build time. In the app directory, getStaticPaths is replaced with generateStaticParams.
export default function Listing(props) {
  return <ListingLayout listings={props.listings} />;
}

export async function getStaticProps(props) {
  const data = await fetch(
    `https://example.com/api/listings/${props.params.id}`,
  );
  const { listings } = await data.json();
  return { props: { listings } };
}

// statically generate routes at build time
export async function getStaticPaths() {
  const data = await fetch(`https://example.com/api/listings`);
  const { listings } = await data.json();
  return { paths: listings.map((listing) => ({ params: { id: listing.id } })) };
}
Headless UI and shadcn/ui
The web platform is severely lacking in terms of UI components. There’s pretty minimal by way of built-in components, and for many that do exist, they are extremely difficult to style. What’s best is to get a “headless” UI library: One which handles the logic of accessible, reusable components, but leaves the styling up to you. Headless UI components separate the logic and behavior of a component from its visual representation. They offer maximum visual flexibility by providing no interface. This approach works especially well with Tailwind CSS, custom design systems, shadcn-style component architectures.
Check out the video So You Think You Can Build A Dropdown? which goes deep into the complexities of designing and building a fully-accessible dropdown menu.
People constantly have to reinvent the wheel to offer fairly basic functionality, so it’s good that there are libraries to handle the behaviour and accessibility while supporting whatever visual styles you want to make.
- Headless UI is a good example, which contains completely unstyled, fully accessible UI components, designed to integrate beautifully with Tailwind CSS.
- Radix UI is a low-level UI component library with a focus on accessibility, customization and developer experience. You can use these components either as the base layer of your design system, or adopt them incrementally. If your goal is to build a product quickly and safely, Radix UI is usually the better choice. It gives you: “Good defaults, fewer decisions, and fewer bugs.”
- Base UI is a library of unstyled UI components for building accessible component libraries, user interfaces, web applications, and websites with React, from the creators of Radix, Floating UI, and Material UI. Base UI shines when flexibility, control, and customization matter more than ready-made behavior.
// Radix UI (Structured Components)
function RadixDialog() {
  return (
    <Dialog.Root>
      <Dialog.Trigger>Open</Dialog.Trigger>

      <Dialog.Portal>
        <Dialog.Overlay className="overlay" />
        <Dialog.Content className="content">
          <Dialog.Title>Dialog title</Dialog.Title>
          <Dialog.Description>Dialog description</Dialog.Description>

          <Dialog.Close>Close</Dialog.Close>
        </Dialog.Content>
      </Dialog.Portal>
    </Dialog.Root>
  );
}

// Base UI (Behavior-First)
function BaseDialog() {
  return (
    <Dialog.Root>
      <Dialog.Trigger>Open</Dialog.Trigger>

      <Dialog.Popup className="content">
        <h2>Dialog title</h2>
        <p>Dialog description</p>

        <button>Close</button>
      </Dialog.Popup>
    </Dialog.Root>
  );
}
Then it leaves us with the decision about how to style things. This is where shadcn/ui comes into the picture. It’s not a component library, but more of a code registry where you can copy/paste/modify the code to your content. It’s built with Tailwind and Radix. shadcn/ui is a collection of reusable components that can be copied and pasted into your apps. Every component can be installed separately. It also provides a CLI that can be used to easily import components into your project, as simple as npx shadcn@latest add card.
If you want a different theme, just go Shadcn “themes” -> “Customize” and click “Copy code”, repalce everything in the @layer base in global.css. And you should check out tweakcn, which comes with a set of pre-built themes that you can use to customize your project.
# start at an empty directory (it will help you to create a Next.js project)
# to create dashboard page with sidebar components
npx shadcn@latest init sidebar-01

# install components from v0
npx shadcn add "https://v0.dev/chat/xxx"

# setup and run your own component registry
# check for https://v0.dev/chat/xxx/json to know how it works
# https://ui.shadcn.com/docs/registry/getting-started
# https://github.com/jherr/shadcn-differ-demo/blob/main/simple.json
npx shadcn@latest init http://localhost:8080/simple.json

# Add simple-ai components (chat interface components)
# https://github.com/Alwurts/simple-ai
npx shadcn@latest add https://simple-ai.dev/r/chat-message.json
You can now turn any public GitHub repository into a registry. Registry items are not limited to components or React code. They can include any files from your repository: https://ui.shadcn.com/docs/registry/github
We also need to know what does cva (class-variance-authority) do. It basically is a function, that allows us to define variants for the element we want to style. A simple variant definition has a name and a list of possible values, each with a list of classes that should apply.
import { cva } from "class-variance-authority";

const buttonVariants = cva(["font-semibold", "border", "rounded"], {
  variants: {
    intent: {
      primary: [
        "bg-blue-500",
        "text-white",
        "border-transparent",
        "hover:bg-blue-600",
      ],
      secondary: [
        "bg-white",
        "text-gray-800",
        "border-gray-400",
        "hover:bg-gray-100",
      ],
    },
    size: {
      small: ["text-sm", "py-1", "px-2"],
      medium: ["text-base", "py-2", "px-4"],
    },
  },
  defaultVariants: {
    intent: "primary",
    size: "medium",
  },
});

buttonVariants();
// => "font-semibold border rounded bg-blue-500 text-white border-transparent hover:bg-blue-600 text-base py-2 px-4"

buttonVariants({ intent: "secondary", size: "small" });
// => "font-semibold border rounded bg-white text-gray-800 border-gray-400 hover:bg-gray-100 text-sm py-1 px-2"
This article “The Incredible Overcomplexity of the Shadcn Radio Button” reflects critical thinking.
Design system examples
A design system is an ever evolving collection of reusable components, guided by rules that ensure consistency and speed, by being the single source of truth for any product development.
-
Stack Overflow’s Design System: https://stackoverflow.design
-
GitHub’s design system: https://primer.style
-
Vercel’s Design System: https://vercel.com/geist/introduction
-
Shopify’s Design System: https://polaris.shopify.com
-
GOV.UK Design System: https://design-system.service.gov.uk
DESIGN.md is a new concept introduced by Google Stitch. A plain-text design system document that AI agents read to generate consistent UI. It’s just a markdown file. Copy a DESIGN.md into your project, tell your AI agent “build me a page that looks like this” and get pixel-perfect UI that actually matches. https://github.com/VoltAgent/awesome-design-md
Set up Prettier and ESLint
Install Prettier and ESLint VSCode plugins and enable format on save in settings (execute save without formatting command to disable). If you don’t see the code formatted automatically on file save then it might be because you have multiple formatters installed in VS Code. Set Format Document With... and choose prettier to get it working.
Install npm packages npm i -D eslint prettier. ESLint only as an npm package does not provide any editor integration, only the CLI executable. Run eslint --init to create a eslintrc.json (or .js, .yml) config file after install eslint globally npm i -g eslint (otherwise need to run ./node_modules/eslint/bin/eslint.js --init), pick the options as you prefer. Add eslint src as a lint script which can be run as npm run lint, and it shows eslint errors in the Problems tab. Run npm run lint -- --fix to fix errors.
Formatting and linting are two separate concerns. Use Prettier for code formatting concerns, and linters for code-quality concerns. Mixing the two can have negative impacts on the performance and understandability of your developer tooling.
eslint-plugin-prettieris a legacy plugin developed a long time ago. It runs Prettier as if it were an ESLint rule, applies formatting on--fix, and is not recommended.eslint-config-prettieris the config that turns off all formatting rules. It’s recommended by Prettier to be used together with Prettier. You’d still use Prettier itself to actually do the formatting. But if you don’t use a legacy ESLint shareable config that enables formatting rules, you probably don’t need this. Addingeslint-config-prettierat the end of the “extends” list doesn’t do anything if nothing enabled formatting rules to begin with.
Check out the following resources:
Lint like a senior developer by CJ
Watch this: https://www.youtube.com/watch?v=Kr4VxMbF3LY
- Install
pnpm i -D eslint @antfu/eslint-config - Update
eslint.config.mjsusing the config from https://gist.github.com/w3cj/21b1f1b4857ecd13d076075a5c5aaf13/ - Try to run the script
"lint": "eslint ."and install the required eslint plugins. - Copy the VS Code support (auto fix on save) settings from https://github.com/antfu/eslint-config to your
.vscode/settings.json. - Add a
"lint:fix": "eslint --fix ."script and run it.
Fastest Frontend Tooling
Read this: https://cpojer.net/posts/fastest-frontend-tooling
What is Husky
While working on an enterprise development team, it is important that all code linting and unit tests are passing before committing code, especially if you are using some form of continuous integration. Git Hooks are a built-in feature of Git that can execute automatically when certain events occur. Husky is a very popular npm package that allows custom scripts to be ran against your repository to prevent bad git commit and git push, which makes commits of fixing lint errors doesn’t happen.
Install husky npm i -D husky and have a “husky” section in the package.json file to add git hooks.
// package.json
"husky": {
  "hooks": {
    "pre-commit": "npm run lint && npm run test",
    "pre-push": "npm test"
  }
}
Background jobs
When a user submits work, a job record is created in the database with a unique ID. This ID is then sent to Inngest to trigger background processing, and the job ID is immediately returned to the user. Inngest processes the job asynchronously and updates the same database record with the results once processing is complete. Meanwhile, the user’s frontend polls an API endpoint that checks the job status in the database. Once the status is marked as “completed,” the frontend retrieves and displays the final results.
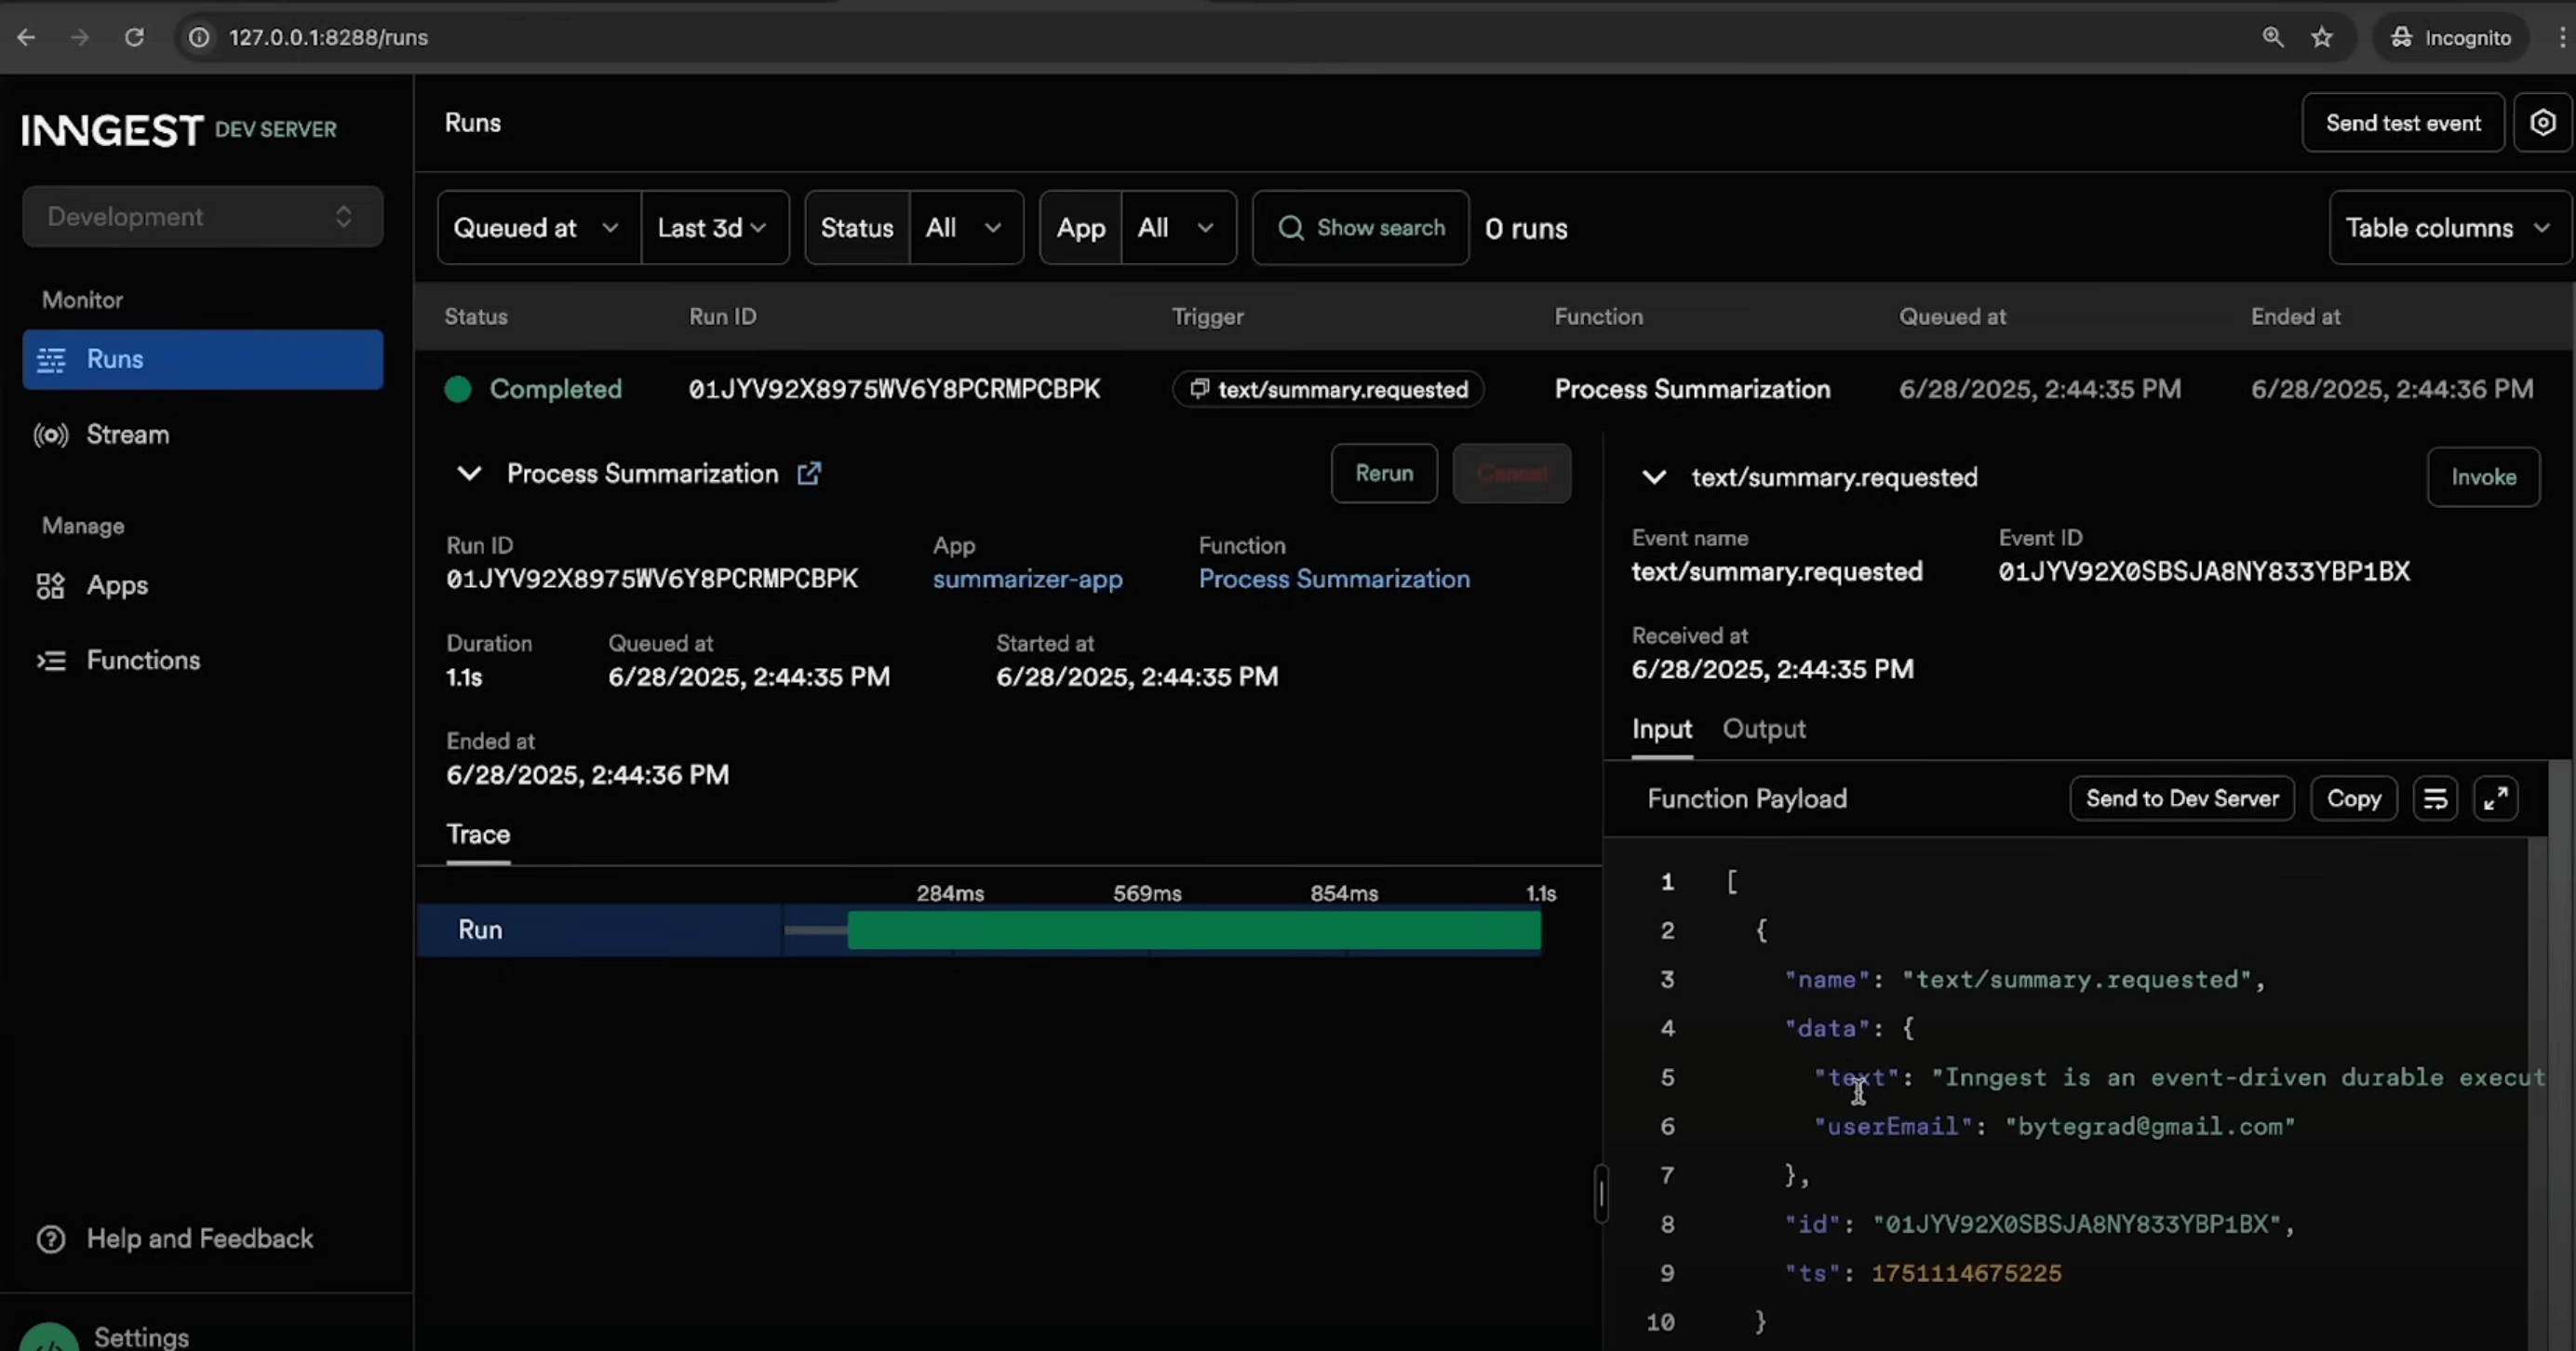
// actions.ts
const jobId = crypto.randomUUID();
await db.jobs.create({ id: jobId, status: "pending" });

await inngest.send({
  name: "text/summary.requested",
  data: { text: formData.get("text"), jobId },
});

return Response.json({ jobId, status: "pending" });
// inngest/inngest.ts
import { Inngest } from "inngest";
export const inngest = new Inngest({ id: "process-summarization" });
// inngest/functions.ts
const processSummarization = inngest.createFunction(
{ id: "process-summarization" },
{ event: "text/summary.requested" }, // when the function is triggered
async ({ event }) => {
const { text, jobId } = event.data;
const summary = await generateSummary(text);
// Save result
await db.jobs.update(jobId, {
status: "completed",
result: summary,
});
return { summary };
},
);
export const functions = [processSummarization];// api/inngest/route.ts
import { inngest } from "@/inngest/inngest"
import { functions } from "@/inngest/functions"
import { serve } from "inngest/next"
// Inngest periodically calls your endpoint to:
// GET = Function registration/sync calls
// POST = Actual function execution
// PUT = Function updates
export const { GET, POST, PUT } = serve({
client: inngest,
functions,
});
// User polls for result
// GET /api/jobs/:jobId
export async function GET(request: Request, { params }) {
const job = await db.jobs.findById(params.jobId);
return Response.json(job);
}Backend For Frontend
We had server-side functionality which we wanted to expose both via our desktop web UI, and via one or more mobile UIs. We often faced a problem in accommodating these new types of user interface, often as we already had a tight coupling between the desktop web UI and our backed services. However the nature of a mobile experience differs from a desktop web experience. In practice, our mobile devices will want to make different calls, fewer calls, and will want to display different (and probably less) data than their desktop counterparts. This means that we need to add additional functionality to our API backend to support our mobile interfaces.
One solution to this problem is that rather than have a general-purpose API backend, instead you have one backend per user experience - or call it a Backend For Frontend (BFF). The BFF is tightly coupled to a specific UI, and will typically be maintained by the same team as the user interface, thereby making it easier to define and adapt the API as the UI requires.
BFFs can be a useful pattern for architectures where there are a number of backend services, as the need to aggregate multiple downstream calls to deliver user functionality increases. In such situations it will be common for a single call in to a BFF to result in multiple downstream calls to microservices (multiple services hold the pieces of information we want).
The other benefit of using a BFF is that the team creating the interface can be much more fluid in thinking about where functionality lives. For example they could decide to push functionality on to the server-side to promote reuse in the future and simplify a native mobile application, or to allow for the faster release of new functionality. This decision is one that can be made by the team in isolation if they own both the mobile application and the BFF - it doesn’t require any cross-team coordination.
Jamstack
Jamstack is a web architecture and stands for Javascript, APIs, and Markup stack. In this architecture, the frontend and the backend are completely separate. All interactions with the backend and third parties are done using APIs. Markup that incorporates Javascript, is pre-built into static assets, served to a client from a CDN, and relies on reusable APIs for its functionalities. A Jamstack site is a set of pre-generated static assets served from a CDN.
Jamstack is a way of working. It’s not a group of frameworks or services or tied to any particular brands or tech stack. Jamstack is defined by how you build websites, rather than the tools with which you choose to build them.
Jamstack sites have better performance, are easier to secure and scale, and cost a lot less than sites built with traditional architectures (Jamstack hosting providers take care of all of this for you). Pre-building pages ensure that any errors can be detected early enough. Most importantly, Jamstack allows teams to outsource complex services to vendors who provide, maintain, and secure APIs used on their sites. The APIs can provide specific functionality to static sites like payments, authentication, search, image uploads using Paypal, Auth0, Algolia, Cloudinary.
The most common types of Jamstack site build tools include static site generators (SSG) and headless content management systems (CMS). Static site generators are build tools that add content to templates and produce static web pages of a site. These generators can be used for Jamstack sites. Some well-known site generators include Hugo, Gatsby, Jekyll, Next.js, etc.
There are two points in time that you can integrate dynamic content into a Jamsack application:
- Build time - During the build process, a Jamstack site can call out to any number of external API services to fetch data to pre-generate static pages. You can think of it like a content cache that applies to all your site’s users.
- Run time - This should typically be content that is user specific, needs to update frequently, or is in response to a specific user action. For example, an ecommerce site may have product details populated at build time, but things like the current inventory, shipping options/prices based upon the user’s location, or the user’s shopping cart would all be populated at run time in the browser. As you may notice, in this example, the content on a single page (product details) may be a combination of both pre-rendered (build time) content (i.e. the product name, photo and description) and run time content (i.e. the product inventory and shipping options based on location).
Serverless
Your code needs to be hosted on a server. Depending on the size of your code and the amount of users you expect to use your product, you might need many servers. Companies used to have their own facilities and warehouses that held their servers and many still do. But for many, this is not ideal. Servers can be difficult to maintain. Maintaining servers and the buildings that house them can become expensive too. That’s where AWS and other cloud providers come in.
Cloud is basically renting out servers and data storage that’s owned by someone else (Serverless does not mean there aren’t any servers; You still need servers to host and run your code.) Through the cloud provider (AWS, Azure, or Google Cloud), you gain access to resources like storage services, servers, networking, analytics, AI, and more. There are many other benefits: You pay only for what you use. You can easily spin up and use new servers when needed, allowing you to scale quickly. You can deploy applications globally.
Serverless is just a way of handling how you are using servers. Instead of handling all the infrastructure and server operations yourself, you’re relying on a cloud provider. There are different families of cloud services:
- Infrastructure as a service (IaaS) - Amazon EC2, Digital Ocean
- Platform as a service (PaaS) - Heroku, AWS Elastic Beanstalk
- Software as a service (SaaS) - Dropbox, iCloud, Slack
- Function as a service (FaaS) - AWS Lambda
On the frontend, you want to
git pushand have your static assets and prerendered pages close to your visitors globally. Platforms like Vercel help you go from idea to global app in seconds.On the backend, you probably don’t want to scale Kubernetes yourself. There’s now fully-managed Kubernetes (AWS EKS, Google Cloud GKE), as well as Google Cloud Run, which allows you to run and automatically scale stateless serverless containers.
Serverless functions are an approach to writing back-end code that doesn’t require writing a back-end. In the simplest terms: we write a function using our preferred language, like JavaScript; we send that function to a serverless provider; and then we can call that function just like any API using HTTP methods.
Netlify functions
The serverless functions can be run by Netlify Dev in the same way they would be when deployed to the cloud. Once you’ve configured the functions directory in your netlify.toml, the functions will be accessible through netlify dev server. e.g. at http://localhost:8888/.netlify/functions/{function-name}. Go through the guide: https://www.netlify.com/blog/intro-to-serverless-functions/
// .netlify/functions/hello-world.js
export const handler = async () => {
  return {
    statusCode: 200,
    body: JSON.stringify({
      message: "Hello world!",
    }),
  };
};fetchBtn.addEventListener("click", async () => {
const response = await fetch("/.netlify/functions/hello-world").then(
(response) => response.json(),
);
responseText.innerText = JSON.stringify(response);
});A real example deployed to Netlify
Bolt doesn’t have built-in hosting for your projects. Instead, it connects to Netlify to provide one-click deployments and hosting. Netlify provides hosting, automated deployment, domain registration, and monitoring tools.
Environment variables starting with VITE_ are embedded into your JavaScript bundle during build. So your deployed JS literally contains something like const XX_API_KEY = "xxx instead of import.meta.env.VITE_XX_API_KEY. Anyone can view your source code and find the API key.
Here’s how to fix this properly using Netlify Functions. The API key lives securely on the server side in .netlify/functions/nba-api.js. Your frontend calls /.netlify/functions/nba-api?endpoint=/players. The Netlify function makes the actual API call with the secret key, and the key never reaches the browser.
In our case, since we’re using a Netlify Function to securely proxy the API (to avoid CORS issues and keep the API key secure), the netlify.toml is essential.
- Build configuration: Tells Netlify how to build your app
- Functions directory: Tells Netlify where to find serverless functions
- SPA routing: Handles client-side routing for React apps
[build]
publish = "dist"
command = "npm run build"

[functions]
directory = ".netlify/functions"

[[redirects]]
from = "/*"
to = "/index.html"
status = 200
What is “edge compute”?
To solve the latency problem, very smart folks came up with the idea of deploying multiple copies of a program and distributing it around the world. When a user makes a request, it can be handled by the closest copy, thus reducing the distance traveled and the time spent in transit.
- The Origin server refers to the main computer that stores and runs the original version of your application code.
- CDNs store static content in multiple locations around the world. When a new request comes in, the closest CDN location to the user can respond with the cached result.
- Similar to CDNs, Edge servers are distributed to multiple locations around the world. But unlike CDNs, which store static content, some Edge servers can run small snippets of code. This means both caching and code execution can be done at the Edge closer to the user.
Cloud = a server, somewhere;
Edge = a server, close to you;
Edge functions = serverless functions run at the Edge;Edge functions without the database in the same place aren’t providing meaningful improvements. Most data is not globally replicated. So running compute in many regions, which all connect to a us-east database, made no sense.
So what JS engines/runtimes do we have now?
- Three main engines: V8 (Chromium), SpiderMonkey (Firefox), JavaScriptCore (Safari)
- Node.js, Deno, Cloudflare Workers: all run on V8
- Bun: runs on JavascriptCore
- Edge-computing providers: a limited JavaScript environment running on CDN Nodes
For example, Cloudflare Workers provides a serverless execution environment that allows you to create new applications without configuring or maintaining infrastructure. Under the hood, the Workers runtime uses the V8 engine. The Workers runtime also implements many of the standard APIs available in most modern browsers. Rather than running on an individual’s machine, Workers functions run on Cloudflare’s Edge Network - a growing global network of thousands of machines distributed across hundreds of locations.
Cloudflare is one of the world’s largest internet networks, designed to improve the speed and security of websites, applications, and blogs. It uses a powerful edge network to deliver content from servers closest to users, ensuring fast performance. Cloudflare also protects online properties from threats such as DDoS attacks, malicious bots, and other cyber threats. Additionally, it offers a free DNS service called 1.1.1.1, which enhances privacy by preventing user data from being tracked or used for targeted advertising.
Read more about The Edge:
- Vercel Edge Functions (using CloudFlare Workers under the hood)
- Netlify Edge Functions (using Deno under the hood)
- Nuxt on the Edge