
Understand npm concepts
package.json and package-lock.json
package-lock.json (called package locks, or lockfiles) is automatically generated for any operations where npm modifies either the node_modules tree or package.json. This file is intended to be committed into source repositories. The purpose of the package-lock.json is to avoid the situation where installing modules from the same package.json results in two different installs. package-lock.json is a large list of each dependency listed in your package.json, the specific version that should be installed, the location (URI) of the module, a hash that verifies the integrity of the module, the list of packages it requires.
- Running
npm iwhen bothpackage.jsonandpackage-lock.jsonexist will use the versions locked inpackage-lock.jsonand will not update the lock file to newer versions even ifpackage.json’s semver ranges allow newer versions. - If you manually edit your
package.jsonto have different ranges and runnpm iand those ranges aren’t compatible with yourpackage-lock.json, then the latter will be updated with version that are compatible with yourpackage.json. - Listed dependencies in
package-lock.jsonfile may have mixed (sha1/sha512) integrity checksum. npm changed the integrity checksum from sha1 to sha512. Only packages published with npm@5 or later will include a sha512 integrity hash.
Don’t pin your dependencies to a specific version and ignore the lock file. The problem is that the depenencies have their denpendencies, and those dependencies have their denpendencies, all the way down. These dependencies use caret (
^) meaning they are not pinned. So the code you run locally may not be the same as the code your CI/CD pipeline runs.
Benefits of exports field
Two fields are mandatory in package.json:
name, can be scopedversion, has to be a valid SemVer number
Package code entry points:
main, default entry point (CJS or ESM)module, ESM-specific entry pointexports, modern entry points, more flexible
// package.json
{
  "name": "my-package",
  "type": "module",
  "exports": {
    ".": {
      // Entry-point for `import "my-package"` in ESM
      "import": {
        // Where TypeScript will look
        "types": "./types/esm/index.d.ts",
        // Where Node.js will look
        "default": "./esm/index.js"
      },
      // Entry-point for `require("my-package") in CJS
      "require": {
        "types": "./types/commonjs/index.d.cts",
        "default": "./commonjs/index.cjs"
      }
    }
  },
  // Fall-back for older versions of TypeScript
  "types": "./types/index.d.ts",
  // CJS fall-back for older versions of Node.js
  "main": "./commonjs/index.cjs"
}
The "exports" field is a modern way to define what parts of your package are exposed to consumers, controlling how your package’s files are imported or required by different module systems (ESM or CommonJS), and which files are accessible when someone imports or requires your package.
The key "." refers to the package root entry point. It means only import "my-package" or require("my-package") is allowed. To import subpaths like my-package/something, you must add the key "./something" to "exports".
Read How To Create An NPM Package by Total TypeScript
Create a package.json with:
filesis an array of files that should be included when people install your package. In this case, we’re including thedistfolder.README.md,package.jsonandLICENSEare included by default.typeis set tomoduleto indicate that your package uses ECMAScript modules, not CommonJS modules.
@arethetypeswrong/cli is a tool that checks if your package exports are correct. Add a script "check-exports": "attw --pack ." to check if all exports from your package are correct.
Add a main field to your package.json with "main": "dist/index.js", and our package is compatible with systems running ESM.
npm run check-exports
┌───────────────────┬──────────────────────────────┐
│                   │ "tt-package-demo"            │
├───────────────────┼──────────────────────────────┤
│ node10            │ 🟢                           │
├───────────────────┼──────────────────────────────┤
│ node16 (from CJS) │ ⚠️ ESM (dynamic import only) │
├───────────────────┼──────────────────────────────┤
│ node16 (from ESM) │ 🟢 (ESM)                     │
├───────────────────┼──────────────────────────────┤
│ bundler           │ 🟢                           │
└───────────────────┴──────────────────────────────┘
If you want to publish both CJS and ESM code, you can use tsup. This is a tool built on top of esbuild that compiles your TypeScript code into both formats. We’ll now be running tsup to compile our code instead of tsc.
// tsup.config.ts
import { defineConfig } from "tsup";

export default defineConfig({
  entryPoints: ["src/index.ts"],
  format: ["cjs", "esm"],
  dts: true,
  outDir: "dist",
  clean: true,
});
This will create a dist/index.js (for ESM) and a dist/index.cjs (for CJS). Add an exports field to your package.json, which tells programs consuming your package how to find the CJS and ESM versions of your package. In this case, we’re pointing folks using import to dist/index.js and folks using require to dist/index.cjs. Run check-exports again, everything is green.
{
  "exports": {
    ".": {
      "import": "./dist/index.js",
      "require": "./dist/index.cjs"
    }
  }
}
tsup also creates declaration files for each of your outputs. index.d.ts for ESM and index.d.cts for CJS. This means you don’t need to specify types in your package.json. TypeScript can automatically find the declaration file it needs.
If you’re building a new library in 2025, just use ESM. All LTS versions of Node support require(esm).
npm install and npm ci
npm install reads package.json to create a list of dependencies and uses package-lock.json to inform which versions of these dependencies to install. If a dependency is not in package-lock.json it will be added by npm install.
npm ci (named after Continuous Integration) installs dependencies directly from package-lock.json and uses package.json only to validate that there are no mismatched versions. If any dependencies are missing or have incompatible versions, it will throw an error. It will delete any existing node_modules folder to ensure a clean state. It never writes to package.json or package-lock.json. It does however expect a package-lock.json file in your project — if you do not have this file, npm ci will not work and you have to use npm install instead.
npm audit automatically runs when you install a package with npm install. It checks direct dependencies and devDependencies, but does not check peerDependencies. Read more about npm audit: Broken by Design by Dan Abramov.
npm outdated, a built-in npm command, will check the registry to see if any installed packages are currently outdated. By default, only the direct dependencies of the root project are shown. Use --all to find all outdated meta-dependencies as well.
- depcheck check your npm module for unused dependencies.
- taze is a modern cli tool that keeps your deps fresh. No installation required —
npx taze.- npm-check-updates upgrades your
package.jsondependencies to the latest versions, ignoring specified versions.- Npm Burst tracks statistics of released npm packages and installed version counts.
dependency overrides
If you need to make specific changes to dependencies of your dependencies, you may add an override. Overrides provide a way to replace a package in your dependency tree with another version, or another package entirely.
To make sure the package foo is always installed as version 1.0.0 no matter what version your dependencies rely on:
{
  "overrides": {
    "foo": "1.0.0"
  }
}

// To only override foo to be 1.0.0 when it's a child of the package bar
{
  "overrides": {
    "bar": {
      "foo": "1.0.0"
    }
  }
}
However, be cautious when doing this because:
- Package A might not work correctly if B’s version is incompatible.
- When package A updates, it might require a different version of B.
- Other packages might also depend on B and need different versions.
npm ls
npm ls (aliases: list, la, ll) list dependencies that have been installed to node_modules. It throws an error for discrepancies between package.json and its lock file.
If depth is not set (default is 0), npm ls will show only the immediate dependencies of the root project. If --all is set, then npm will show all dependencies by default.
What do “idealTree” and “reify” mean in the context of npm?
AnidealTreeis the tree of package data that we intend to install.actualTreeis the representation of the actual packages on disk.During lockfile validation, npm compares the inventory of package items in the tree that is about to be installed (
idealTree) with the inventory of items stored in the package-lock file (virtualTree).During reification, the
idealTreeis diffed against the actual tree, and then the nodes from the ideal tree are extracted onto disk. At the end ofreify(), the ideal tree is copied toactualTree, since then it reflects the actual state of thenode_modulesfolder.
dependencies, devDependencies and peerDependencies
Dependencies are required at runtime, like a library that provides functions that you call from your code. If you are deploying your application, dependencies has to be installed, or your app will not work. They are installed transitively (if A depends on B depends on C, npm install on A will install B and C). Example: lodash, your project calls some lodash functions.
devDependencies are dependencies you only need during development, like compilers that take your code and compile it into javascript, test frameworks or documentation generators. They are not installed transitively (if A depends on B dev-depends on C, npm install on A will install B only). Example: grunt, your project uses grunt to build itself.
-
The
npm installcommand will install both devDependencies and dependencies. With the--productionflag or when theNODE_ENVenvironment variable is set to productionNODE_ENV=production npm install, npm will not install modules listed in devDependencies. -
When you install a package, npm automatically installs its dependencies but not its devDependencies. This is because you are consuming it as a dependency and don’t need its development tools.
-
Using the
npm uninstall --no-savewill tell npm not to remove the package from yourpackage.jsonorpackage-lock.jsonfiles.
peerDependencies are dependencies that your project hooks into, or modifies, in the parent project, usually a plugin for some other library. It is just intended to be a check, making sure that the project that will depend on your project has a dependency on the project you hook into. So if you make a plugin C that adds functionality to library B, then someone making a project A will need to have a dependency on B if they have a dependency on C. Example: your project adds functionality to grunt and can only be used on projects that use grunt.
In npm versions 3 through 6, peerDependencies were not automatically installed, and would raise a warning if an invalid version of the peer dependency was found in the tree. As of npm v7, peerDependencies are installed by default. If your dependency contains some peerDependencies that conflict with the root project’s dependency, run npm install --legacy-peer-deps to skips strict peer dependency checks, allowing installation of packages with unmet peer dependencies to avoid errors. (--force flag will ignore and override any dependency conflicts, forcing the installation of packages.)
optionalDependencies are dependencies that are not critical to your application’s core functionality but can enhance it if available. If a package listed in optionalDependencies fails to install due to incompatibility with the user’s system, npm will not treat it as an error and will continue the installation process. This is useful when a dependency may not work on all environments. For example, a package might only work on macOS but not on Windows. In such cases, you should include a fallback in your code to ensure your application still runs properly if the optional dependency is missing.
@npmcli/arborist, the npm tree doctor, is the library that calculates dependency trees and manages thenode_modulesfolder hierarchy for the npm command line interface. It’s used in some tools like npm-why to help identify why a package has been installed.npm (v7+) uses Arborist for dependency resolution, building a logical graph of dependencies overlaid on a physical tree of folders.
URLs as dependencies
- Git URLs as dependencies using SSH or HTTPS with credentials:
"my-package": "git+ssh://git@github.com:myaccount/myprivate.git" "my-package": "git+ssh://git@github.com:myaccount/myprivate.git#develop" "my-package": "git+https://username:password@github.com/myaccount/myprivate.git" - GitHub URLs: refer to GitHub urls as
"foo": "user/foo-project". This is equivalent to:https://github.com/user/foo-project.git - Local Paths: You can provide a path to a local directory that contains a package
"bar": "file:../foo/bar"
You can configure npm to resolve your dependencies across multiple registries.
# .npmrc

# Fetch `@lihbr` packages from GitHub registry
@lihbr:registry=https://npm.pkg.github.com

# Fetch `@my-company` packages from My Company registry
@my-company:registry=https://npm.pkg.my-company.com
fix broken node modules instantly
patch-package lets app authors instantly make and keep fixes to npm dependencies. Patches created are automatically and gracefully applied when you use npm or yarn.
# fix a bug in one of your dependencies
vim node_modules/some-package/brokenFile.js

# it will create a folder called `patches` in the root dir of your app.
# Inside will be a `.patch` file, which is a diff between normal old package and your fixed version
npx patch-package some-package

# commit the patch file to share the fix with your team
git add patches/some-package+3.14.15.patch
git commit -m "fix brokenFile.js in some-package"
// package.json
"scripts": {
"postinstall": "patch-package"
}simplest supply chain defense
Minimum Release Age is an underrated supply chain defense.
# .npmrc
min-release-age=7

# pnpm-workspace.yaml
minimumReleaseAge: 10080 # 7 days in minutes

# bunfig.toml
[install]
minimumReleaseAge = 604800 # 7 days in seconds
The package manager simply refuses to install any package version that was published less than 7 days ago. By the time 7 days pass, compromised versions are detected, reported, and pulled from the registry.
npm and npx
One might install a package locally on a certain project using npm install some-package, then we want to execute that package from the command line. Only globally installed packages can be executed by typing their name only. To fix this, you must type the local path ./node_modules/.bin/some-package.
npx comes bundled with npm version 5.2+. It will check whether the command exists in $PATH or in the local project binaries and then execute it. So if you wish to execute the locally installed package, all you need to do is type npx some-package.
Have you ever run into a situation where you want to try some CLI tool, but it’s annoying to have to install a global just to run it once? npx is great for that. It will automatically install a package with that name from the npm registry and invoke it. When it’s done, the installed package won’t be anywhere in the global, so you won’t have to worry about pollution in the long-term. For example, npx create-react-app my-app will generate a react app boilerplate within the path the command had run in, and ensures that you always use the latest version of the package without having to upgrade each time you’re about to use it. There’s an awesome-npx repo with examples of things that work great with npx.
npm will cache the packages in the directory
~/.npm/_npx. The whole point of npx is that you can run the packages without installing them somewhere permanent. So I wouldn’t use that cache location for anything. I wouldn’t be surprised if cache entries were cleared from time to time. I don’t know what algorithm, if any, npx uses for time-based cache invalidation.
You can find the npm-debug.log file in your .npm directory. To find your .npm directory, use npm config get cache. (It is located in ~/.npm so shared accross nodejs versions that nvm installed.) The default location of the logs directory is a directory named _logs inside the npm cache.
npm init and exec
npm init <initializer> can be used to set up a npm package. initializer in this case is an npm package named create-<initializer>, which will be installed by npm exec. The init command is transformed to a corresponding npm exec operation like npm init foo -> npm exec create-foo. Another example is npm init react-app myapp, which is same as npx create-react-app myapp. If the initializer is omitted (by just calling npm init), init will fall back to legacy init behavior. It will ask you a bunch of questions, and then write a package.json for you. You can also use -y/--yes to skip the questionnaire altogether.
npm createis an alias fornpm init. Check more aboutnpm init --help.
npm 7 introduced the new npm exec command which, like npx, provided an easy way to run npm scripts on the fly. If the package is not present in the local project dependencies, npm exec installs the required package and its dependencies to a folder in the npm cache. With the introduction of npm exec, npx had been rewritten to use npm exec under the hood in a backwards compatible way, and the standalone npx package deprecated at that time.
npm link
- Run
npm linkfrom yourMyModuledirectory: this will create a global package{prefix}/node/{version}/lib/node_modules/<package>symlinked to theMyModuledirectory. - Run
npm link MyModulefrom yourMyAppdirectory: this will create aMyModulefolder innode_modulessymlinked to the globally-installed package and thus to the real location ofMyModule. Note that<package-name>is taken frompackage.json, not from the directory name. - Now any changes to
MyModulewill be reflected inMyApp/node_modules/MyModule/. Usenpm ls -g --depth=0 --linkto list all the globally linked modules. - Run
npm unlink --no-save <package>on your project’s directory to remove the local symlink.
npm and pnpm
The very first package manager ever released was npm, back in January 2010. In 2020, GitHub acquired npm, so in principle, npm is now under the stewardship of Microsoft. (npm should never be capitalized unless it is being displayed in a location that is customarily all-capitals.)
npm handles the dependencies by splitting the installation process into three phases: Resolving -> Fetching -> Linking. Each phase needs to end for the next one to begin.
pnpm was released in 2017. It is a drop-in replacement for npm, so if you have an npm project, you can use pnpm right away. The main problem the creators of pnpm had with npm was the redundant storage of dependencies that were used across projects.
Traditionally, npm installed dependencies in a flat node_modules folder. On the other hand, pnpm manages node_modules by using hard linking and symbolic linking to a global on-disk content-addressable store. It results in a nested node_modules folder that stores packages in a global store on your home folder (~/.pnpm-store/). Every version of a dependency is physically stored in that folder only once, constituting a single source of truth. pnpm identifies the files by a hash id (also called “content integrity” or “checksum”) and not by the filename, which means that two same files will have identical hash id and pnpm will determine that there’s no reason for duplication.
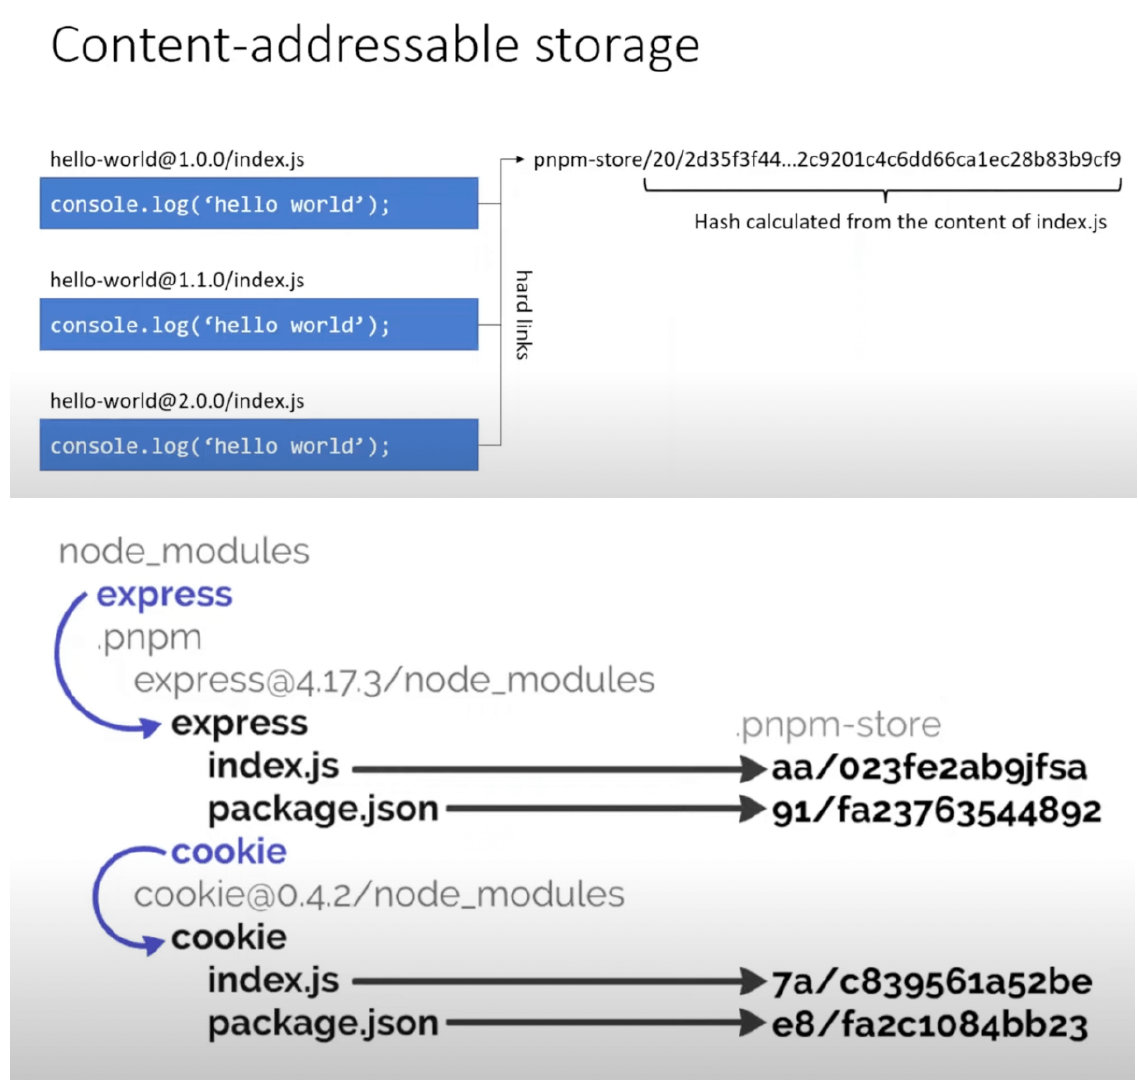
- It hard-links each file from the global store into the project’s
.pnpmdirectory insidenode_modules. - In
node_modules, each package folder is a symbolic link that points to the actual package content inside a hidden.pnpmdirectory.
pnpm shamefully-hoist=true configuration
pnpm organizes node_modules differently from npm, exposing only the dependencies explicitly declared in package.json. Transitive dependencies are installed in node_modules/.pnpm/registry.npmjs.org/, rather than the flat structure for node_modules as npm.
In simple terms, if there is a module A that depends on module B, and module A is depended on in the project’s package.json, module A can access module B, but the project cannot. When shamefully-hoist=true is set, module B will be hoisted, making it accessible in the project.
pnpm Catalogs
pnpm Catalogs is a feature allowing monorepo workspaces to share dependency versions across different packages via a centralized management location. Basically, you add catalog or catalogs fields to your pnpm-workspace.yaml file and reference them using catalog:<name> in your package.json. For the default catalog only, a special catalog: shorthand can also be used. Think of catalog: as a shorthand that expands to catalog:default.
# pnpm-workspace.yaml
# create a catalog named default
catalog:
  react: ^18.2.0
  react-dom: ^18.2.0

# create arbitrarily named catalogs
catalogs:
  react18:
    react: ^18.2.0
    react-dom: ^18.2.0
// package.json
"dependencies": {
"react": "catalog:",
}
"dependencies": {
"react": "catalog:react18",
"react-dom": "catalog:react18",
}monorepo setup
Monorepos are specified using a pnpm-workspace.yaml file alongside packages.json, with a list of paths to directories in packages property.
# The only field in this config file
packages:
  - apps/*
  - packages/*
// root package.json
{
"name": "awesome-monorepo",
"scripts": {
"dev": "pnpm run -r --parallel --aggregate-output dev",
// "build": "pnpm run -r build",
"build": "pnpm --filter=@awesome/* run build",
"clean": "rimraf 'packages/*/{dist,node_modules}' && rimraf node_modules",
}
}
// packages/utils/package.json
{
"name": "@awesome/utils",
"main": "dist/index.js",
"module": "dist/index.esm.js",
"types": "dist/index.d.ts",
"files": ["dist"],
"scripts": {
"build": "tsup src/index.ts --format cjs,esm --dts",
"dev": "tsup src/index.ts --format cjs,esm --dts --watch",
}
}
// packages/api-client/package.json
{
"name": "@awesome/api-client",
"main": "dist/index.js",
"module": "dist/index.esm.js",
"types": "dist/index.d.ts",
"files": ["dist"],
"scripts": {
"build": "tsup src/index.ts --format cjs,esm --dts",
"dev": "tsup src/index.ts --format cjs,esm --dts --watch",
},
"dependencies": {
"@awesome/utils": "workspace:*"
}
}To add a local dependency within a monorepo, in your package.json “dependencies” field you’ll prefix your local dependencies’ version-range strings with "workspace:^" (workspace: indicates that the dependency should be resolved from the local workspace packages rather than pulling from an external registry. ^ means the version should follow the semver caret (^) range rule.) workspace:* uses the exact version of the dependency as defined in its package.json within the workspace.
# Development dependencies for the workspace root
# Adding a new dependency to the root workspace package fails,
# unless the `--ignore-workspace-root-check` or `-w` flag is used.
pnpm add -Dw typescript @types/node eslint

# Add React to a package
pnpm add react react-dom --filter @awesome/api-client

# Add @awesome/utils as dependency to @awesome/api-client
pnpm add @awesome/utils --filter @awesome/api-client

# Use wildcard version for latest workspace version
pnpm add @awesome/utils@workspace:* --filter @awesome/api-client
There is not much difference between
pnpm addandpnpm install. We usepnpm addwhen we want to add a new dependency; We usepnpm installwhen we have an existing project with the lockfile and we want to install all dependencies from the lockfile. The only difference is thatpnpm addwill fail when executed without args.pnpm installwill work in both cases.
pnpm dlx (dlx stands for “Download and Execute”, pnpx is an alias for pnpm dlx) fetches a package from the registry without installing it as a dependency, hotloads it, and runs whatever default command binary it exposes. e.g. pnpm dlx create-vue my-app.
You can run all of your package.json scripts via pnpm <script-name>. You can also run your installed binaries with pnpm <command>. For example, you might want to run local versions of Typescript (pnpm tsc) or eslint (pnpm eslint). npm uses a separate command (npx) to run binaries.
npm scripts
npm scripts are a set of built-in and custom scripts defined in the package.json file. Their goal is to provide a simple way to execute repetitive tasks.
-
npm makes all your dependencies’ binaries available in the scripts. So you can access them directly as if they were referenced in your PATH. For example, instead of doing
./node_modules/.bin/eslint ., you can useeslint .as the lint script. -
npm runis an alias fornpm run-script, meaning you could also usenpm run-script lint. -
Built-in scripts can be executed using aliases, making the complete command shorter and easier to remember. For example,
npm run-script test,npm run test,npm test, andnpm tare same to run the test script.npm run-script start,npm run start, andnpm startare also same. -
Run
npm runif you forget what npm scripts are available. This produces a list of scripts, and displays the code that each script runs. -
We can use
&&to run multiple scripts sequentially. If the first script fails, the second script is never executed. Another option is using the library like concurrently to run multiple commands concurrently:"dev": "concurrently \"npm run server\" \"npm run client\"". -
Use
npm run <script> --silentto reduce logs and to prevent the script from throwing an error. This can be helpful when you want to run a script that you know may fail, but you don’t want it to throw an error. Maybe in a CI pipeline, you want your whole pipeline to keep running even when the test command fails. -
We can create “pre” and “post” scripts for any of our scripts, and npm will automatically run them in order.
{ "scripts": { "prefoo": "echo prefoo", "foo": "echo foo", "postfoo": "echo postfoo" } } -
You can run
npm config ls -lto get a list of the configuration parameters, and you can use$npm_config_prefix (like$npm_config_editor) to access them in the scripts. Any key-value pairs we add to our script will be translated into an environment variable with thenpm_configprefix.{ "scripts": { "hello": "echo \"Hello $npm_config_firstname\"" } } // Output: "Hello Paula" npm run hello --firstname=Paula -
package.jsonproperties are available viaprocess.env(withnpm_package_prefix) in Node scripts by default.{ "name": "foo", "version":"1.2.5", } // When you run Node.js files via npm scripts // Output: 'foo', '1.2.5' console.log(process.env.npm_package_name, process.env.npm_package_version); -
Passing arguments to other npm scripts, we can leverage the
--separator. e.g."pass-flags-to-other-script": "npm run my-script -- --watch"will pass the--watchflag to themy-scriptcommand. -
One convention that you may have seen is using a prefix and a colon to group scripts, for example
build:devandbuild:prod. This can be helpful to create groups of scripts that are easier to identify by their prefixes. -
shx is a wrapper around ShellJS Unix commands, providing an easy solution for simple Unix-like, cross-platform commands in npm package scripts. ShellJS is a portable (Windows/Linux/macOS) implementation of Unix shell commands on top of the Node.js API.
shxis good for writing one-off commands in npm package scripts (e.g."clean": "shx rm -rf out/"). Runnpm install shx --save-devto install it, and run command in either a Unix or Windows command line.
What is pkg.pr.new
With pkg.pr.new, each of your commits and pull requests will trigger an instant preview release without publishing anything to NPM. This enables users to access features and bug-fixes without the need to wait for release cycles using npm or pull request merges. We call it “Continuous Releases” too.
It uses a CLI and GitHub Actions to publish unreleased packages to a temporary npm-compatible registry. You can trigger continuous releases by running: npx pkg-pr-new publish from your GitHub actions setup.
# First, install the GitHub application on your repositories.

# Then, create continuous releases.
npx pkg-pr-new publish

npm i https://pkg.pr.new/tinylibs/tinybench/tinybench@a832a55
# npm i https://pkg.pr.new/${owner}/${repo}/${package}@{commit}
What is JSR
The JavaScript Registry (JSR) is a modern package registry (not a package manager). JSR works with many runtimes (Node.js, Deno, Bun, browsers, and more) and is backwards compatible with npm. JSR is designed for TypeScript. You publish TypeScript source, and JSR handles generating API docs, .d.ts files, and transpiling your code for cross-runtime compatibility. Check out: https://jsr.io/docs/why
# deno
deno add jsr:@luca/cases

# npm (use any of npx, yarn dlx, pnpm dlx, or bunx)
npx jsr add @luca/cases

# starting with pnpm v10.9
pnpm add jsr:<scope>/<pkg_name>

# since Yarn v4.9.0
yarn add jsr:<scope>/<pkg_name>